 ASPNetWorld

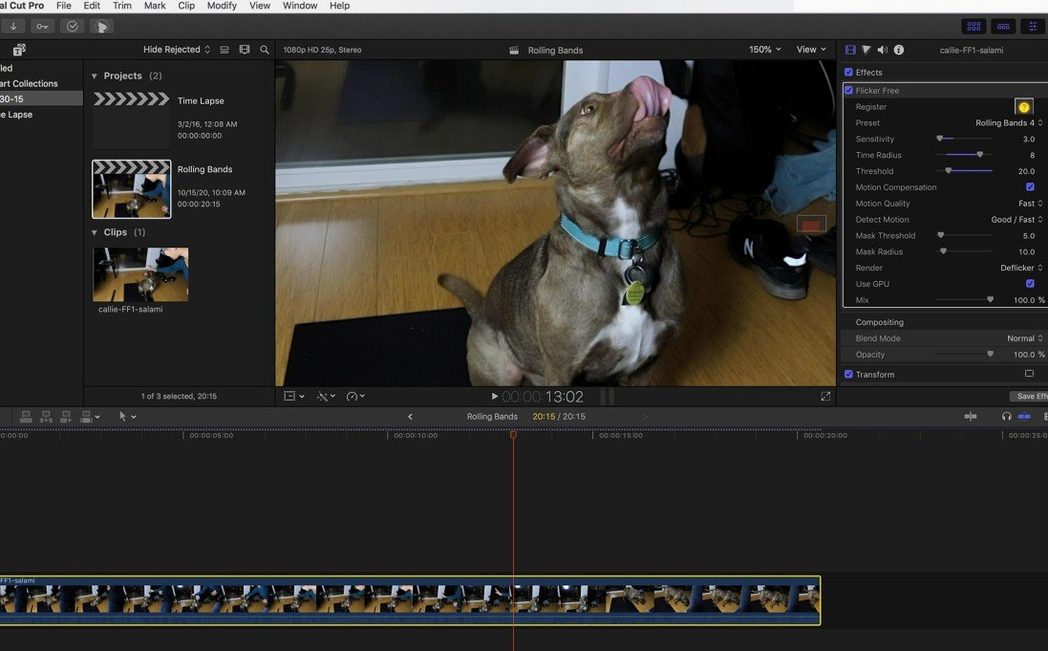
Native binary runs on Intel and Apple Silicon without translation
The plugin comes as a 64-bit universal binary, so it runs natively on both Intel and Apple Silicon machines. If your editing app can load OpenFX, FxPlug, or AAX plugins, you are in business.
What sort of flicker does it actually fix?
Fluorescent lights cycling out of sync with a fast shutter, computer monitors rolling a black bar through the shot, or a time-lapse where the aperture chatters between frames—that is the territory. It is not a general-purpose stabiliser; it hunts brightness shifts that repeat or pulse, including the stutter you get from cameras like a GoPro HERO3 Black or a Phantom Flex when the electrical frequency fights the frame rate.
Where does the processing happen?
Everything happens on the timeline, inside your host. You apply Flicker Free as a clip effect in Premiere Pro, After Effects, Final Cut Pro, DaVinci Resolve, Avid Media Composer, or any OpenFX-compatible system. You can preview a short section with a quick render before you commit to baking the effect over a whole reel, which saves a lot of guesswork when you are up against a deadline.
Set the flicker period to match 50Hz mains, 60Hz, or an LED wall
The main control sets the flicker’s period—think of it as telling the plugin whether it is chasing a 50Hz mains pulse, a 60Hz one, or the irregular refresh of an LED wall. A time analysis window lets the algorithm look ahead so it does not overcorrect a genuine lighting change, and you can dial back the effect strength when you want to keep a gentle candle flicker but kill the aggressive fluorescent buzz.
Common mistakes that trip people up
The most frequent one I see in class is expecting the plugin to know what it is looking at without being told. Someone drops Flicker Free onto a clip, leaves everything on automatic, and then grumbles when a slow sunset dim gets smoothed into flat grey. The algorithm is clever, but it cannot read your mind. If you do not set the flicker period roughly right—50Hz for UK mains, 60Hz for the US, or a custom value for an LED wall with its own refresh—you are asking it to solve a puzzle while blindfolded.
Another habit worth breaking is applying the effect to an entire hour-long timeline in one go. I know the temptation: set it, render, walk away. But a camera move that sweeps past a window will have a completely different flicker profile than a locked-off interview under office lights. Cut the clip into sections first, or at least scrub through with a short preview render on each scene change. It takes an extra three minutes and saves a re-render later.
And if you are working with time-lapse, do not feed the plugin the raw stills sequence without checking for exposure ramping first. Flicker Free handles frame-to-frame brightness jumps beautifully, but a gradual exposure shift across two hundred frames—the kind you get from a changing sky—needs a different tool, or at least a pass of the Time Analysis window set wide enough to see the trend.
A 10-second 4K ProRes clip processes in eight to twelve seconds on M1 Max
On an M1 Max MacBook Pro with 32GB of RAM, a ten-second 4K ProRes clip processes in roughly eight to twelve seconds, depending on how aggressive you set the detection. That is quick enough that it rarely breaks the flow of an edit. On an older Intel iMac from 2019, the same clip takes closer to twenty-five seconds—still usable, but you learn to render in short bursts rather than queueing up a feature-length timeline.
Memory use stays polite. I have watched Activity Monitor while the plugin crunches through a UHD sequence, and it rarely climbs above an extra 1.2GB beyond what the host editor already occupies. That means you can keep other effects stacked without the system wheezing. Stability has been solid across the hosts I use most—Premiere Pro, After Effects, and Resolve—though I did once see it refuse to load in an older build of Avid until I trashed the plugin cache. A quick restart of the host fixed it, which is standard troubleshooting for any third-party effect.
One thing the manual does not shout about: the plugin respects the render queue properly. If you send a timeline to Media Encoder or the Resolve delivery page, it does not need babysitting. I have left it overnight on a twenty-minute sequence and come back to a finished file with no dropped frames and no memory leaks.
Where Resolve’s deflicker falls short on complex LED and rolling bands
DaVinci Resolve Studio has a built-in deflicker, and if you are grading inside Resolve and only dealing with mild fluorescent pulse, it does a decent job. Where it falls short is on complex LED flicker or the chaotic rolling bands you get from a cheap monitor. Flicker Free digs deeper into the frame analysis, and the period control is far more direct than Resolve’s slider-based approach, which always feels a bit guessy to me.
RE:Vision Effects’ DEFlicker is the plugin most people compare it with. DEFlicker is excellent on time-lapse, especially when you need to smooth exposure ramps as well as fast flicker. It offers more parameters for fine-tuning motion-adaptive work. But that depth comes with a steeper learning curve. Flicker Free’s preset-driven workflow—pick your scenario, tweak two or three knobs, render—gets you to a clean result faster, and for the kind of broadcast work where you just need to rescue an interview shot under bad lighting, that speed matters more than having fifty sliders.
Boris FX BCC Flicker Fixer is another contender, bundled inside the large Continuum suite. It is competent but broad rather than specialised. Its presets cover interlacing and frame-rate conversion flicker as well, which is handy if you are restoring archive material. For pure modern production flicker—the GoPro time-lapse under sodium lights, the Phantom Flex slow-motion in an office—Flicker Free feels more focused, and the render times are noticeably shorter on Apple Silicon.
Option-drag the period slider to snap to common electrical frequencies
- Hold Option while dragging the flicker period slider and it snaps to common electrical frequencies—50Hz, 60Hz, 120Hz—so you are not typing numbers from a sticky note.
- The View Flicker Map checkbox, tucked at the bottom of the effect panel, overlays a grayscale preview showing exactly which pixels the plugin is adjusting. It is the quickest way to check that you are not accidentally flattening genuine lighting changes like a camera flash or a disco ball.
- You can save a preset that includes your time analysis window, detection type, and strength, then apply it to a batch of clips in Premiere Pro. Right-click the effect, choose Save Preset, and give it a name that describes the scenario—"Office LED 50Hz" earns its keep on long-form corporate work.
- In DaVinci Resolve, the plugin respects the node graph like any OpenFX effect, but if you apply it before a colour grade, the grade picks up a cleaner signal. Put it early in the chain, right after any noise reduction, and your scopes will thank you.
- The Time Analysis control defaults to looking five frames ahead and behind. On rapid flicker—the kind from a PWM-dimmable LED at 200Hz—dropping that to two frames stops the algorithm from over-smoothing and keeps the corrections tight.
- macOS — compatible with current and recent Apple operating systems
- Architecture — universal binary (Intel 64-bit and Apple Silicon)
- Host — any application supporting OpenFX, FxPlug, or AAX formats
Questions from the class 0
Sign in or join the class to ask a question.
Nobody has asked anything yet. If you have used it on a real job, say what the file did.
Also on the Mac Apps shelf
The whole Mac Apps shelf Folder Preview Pro
Lets you peek inside folders without fully opening them.
Folder Preview Pro
Lets you peek inside folders without fully opening them.
 FontLab
Lets you design and refine your own typefaces.
FontLab
Lets you design and refine your own typefaces.
 Find Any File
Scans your disks directly to find files the Finder misses.
Find Any File
Scans your disks directly to find files the Finder misses.
 ForkLift
Moves files between folders and servers in a dual-pane view.
ForkLift
Moves files between folders and servers in a dual-pane view.
 Final Cut Pro
Tracks moving objects so titles and blurs follow them automatically.
Final Cut Pro
Tracks moving objects so titles and blurs follow them automatically.
 FotoMagico
Builds timed slideshows that feel more like short films.
FotoMagico
Builds timed slideshows that feel more like short films.
 FileMaker Pro
Helps you build custom databases without writing all the code yourself.
FileMaker Pro
Helps you build custom databases without writing all the code yourself.
 FxFactory Pro
Adds a library of video effects to your editing software.
FxFactory Pro
Adds a library of video effects to your editing software.