 ASPNetWorld
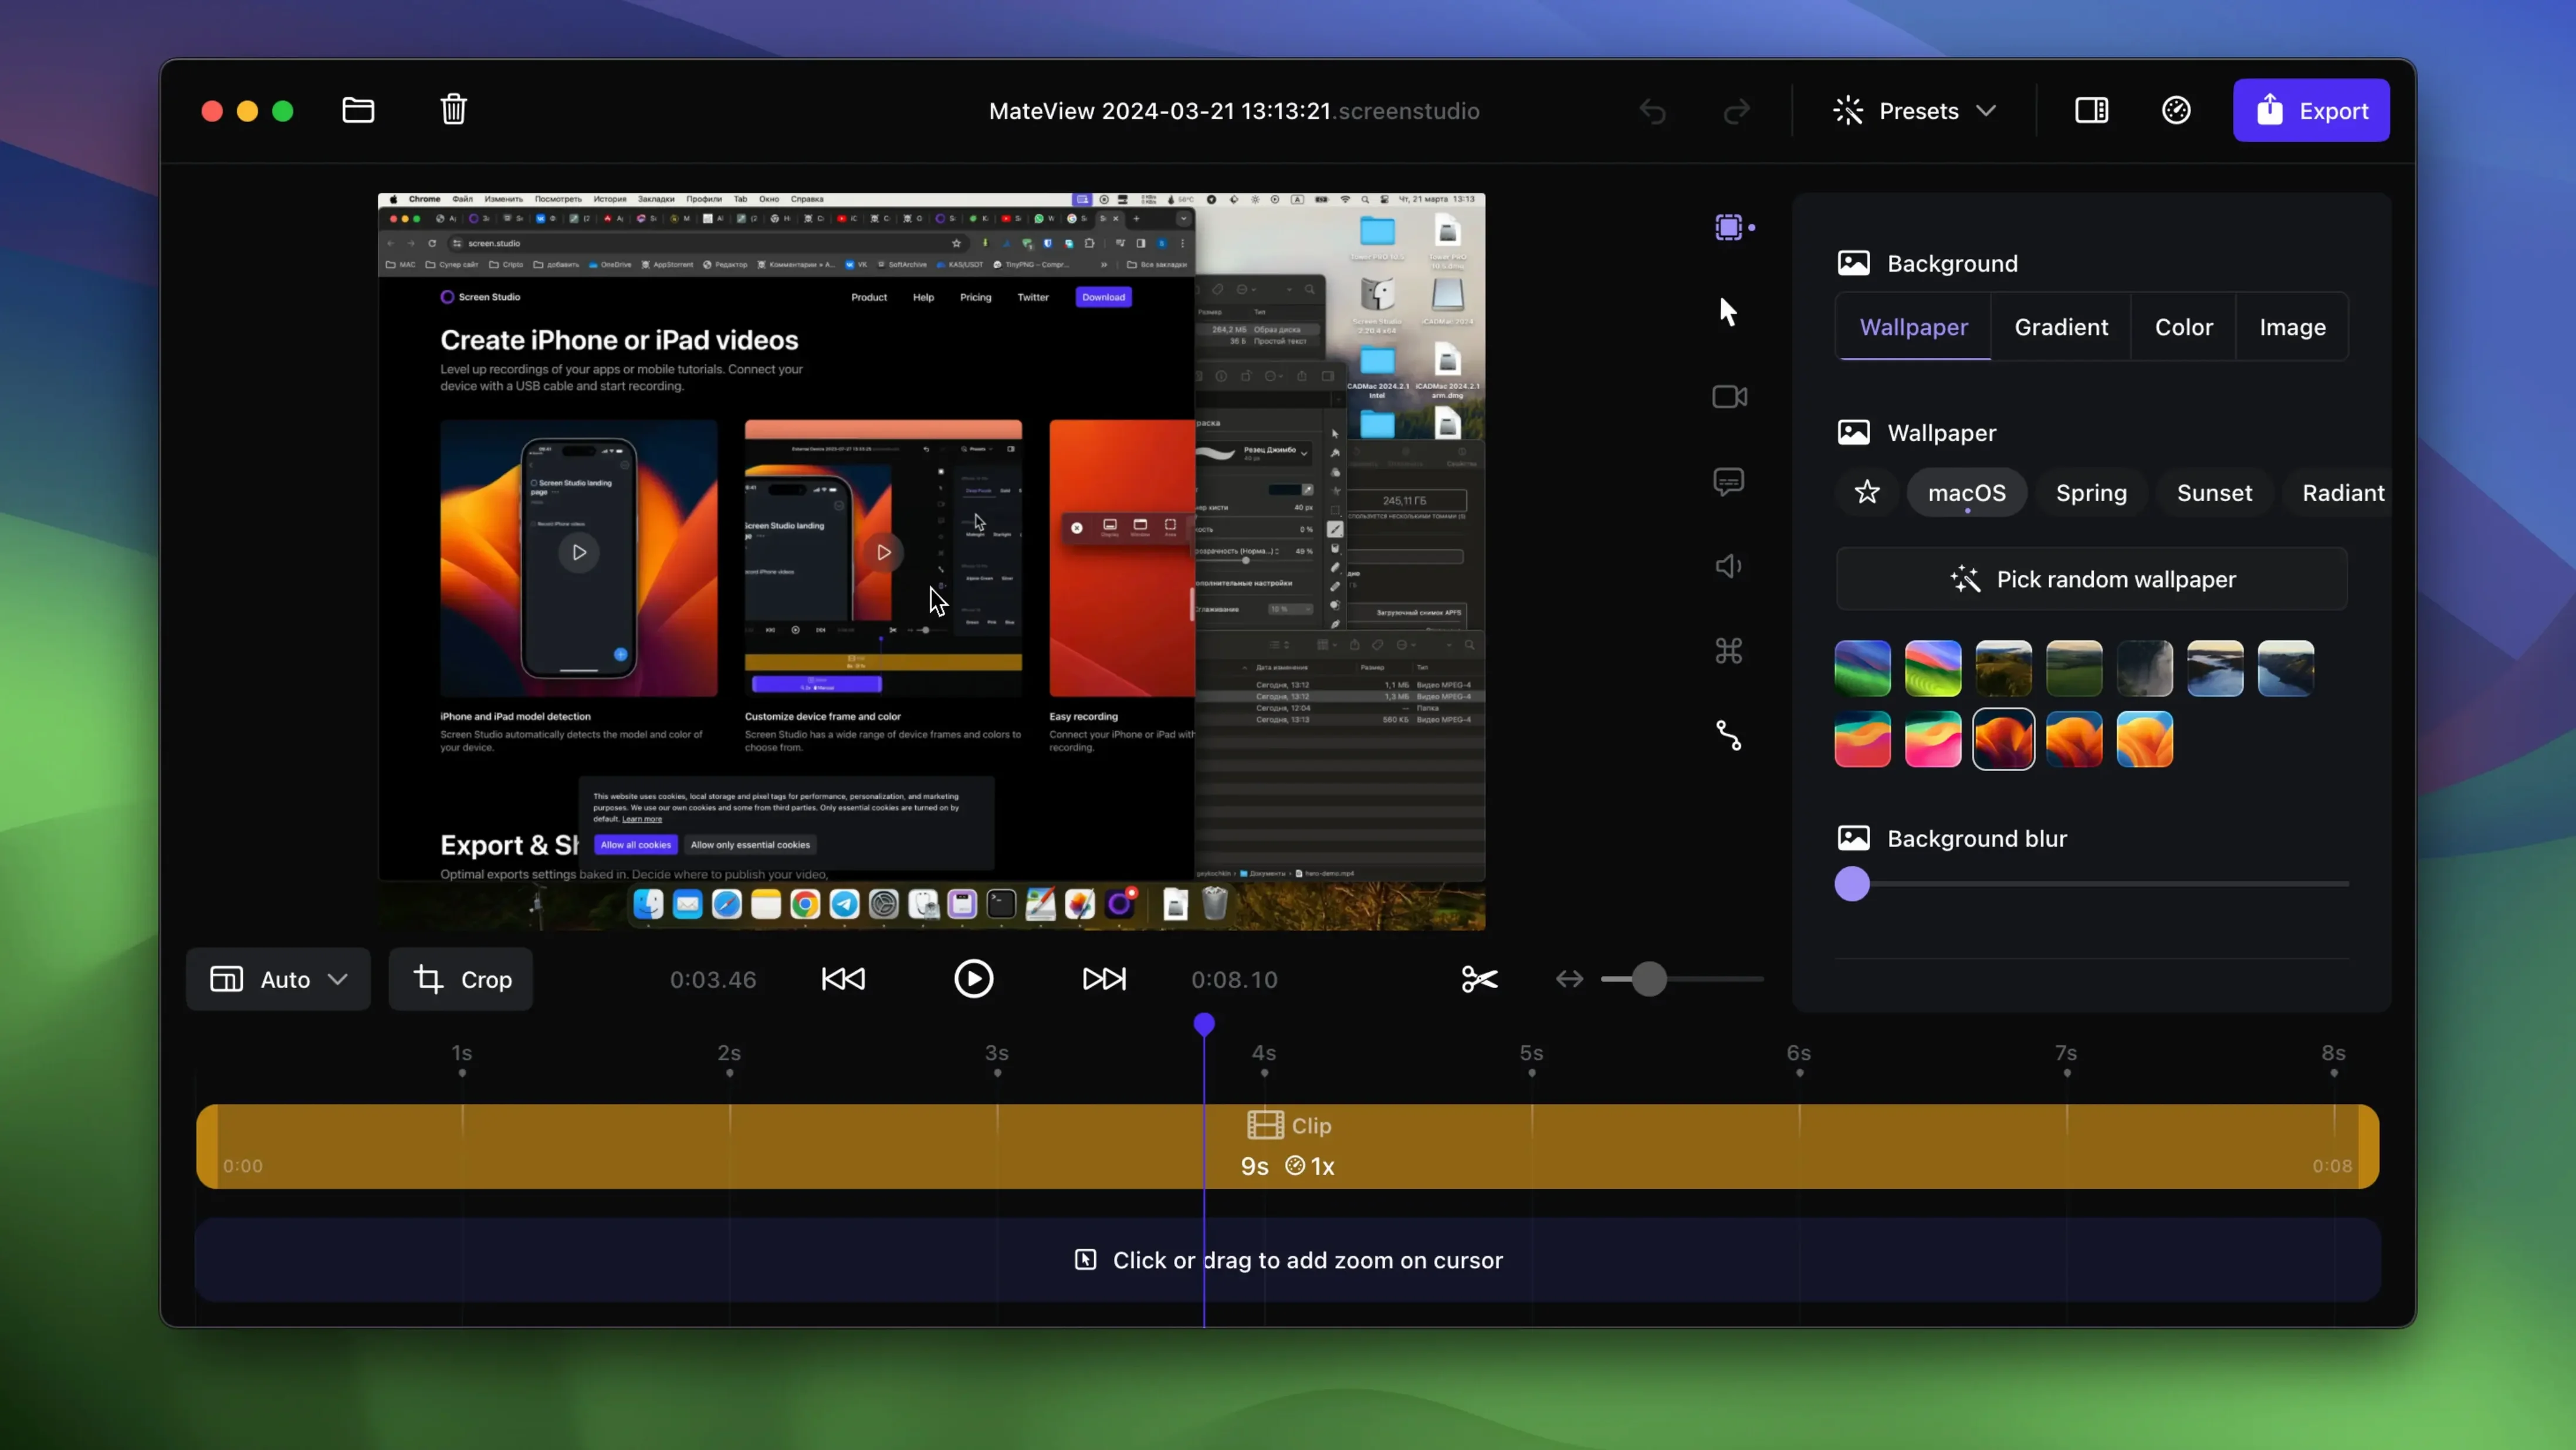
If you've ever used QuickTime Player to grab a screen clip and then spent twice as long trimming dead air and apologising for a tiny cursor nobody could follow, Screen Studio is the tool that makes you wonder why you waited. QuickTime gives you a straight recording; Screen Studio gives you a camera operator, a sound engineer, and an editor who all work before you even hit stop. Here are the first two things to try once you've got it open.
Let the camera do the thinking
Pick any app window and start a recording. Don't adjust anything yet — just watch. Screen Studio will automatically zoom into the action as you click around menus and dialogs. It’s not a static crop; the motion follows your focus, pulling the viewer's eye exactly where it needs to be. Once you stop, try resizing the cursor after the fact using the on-screen control. You can make it larger for a tutorial, or hide it during idle moments with a smooth fade so the screen stays clean. If your desktop is a mess of files and folders, switch on the option to hide desktop icons during capture — it tucks them away until you finish, then restores everything. The whole experience feels less like recording and more like directing a tiny documentary of your own screen.
Clipboard export and the selfie-cam
The feature that changes daily workflow is the clipboard export. Once you've recorded a quick explanation, you can copy the finished video straight to the clipboard and paste it into Slack, an email, or a Notion page — no file to name, no Finder window to dig through later. Before you export, add the selfie overlay from the sidebar. It will appear as a small, reduced-size circle in the corner, and if you've connected an iPhone or iPad, the app will automatically detect its model and colour, framing the device neatly in the shot. For longer exports, the engine will deliver up to 4K at 60 frames per second, with voice volume normalised and background noise cleaned up without you touching a dial.
Save a custom preset right away to skip repetitive setup
Start by creating a custom recording preset — even a simple one saves more time than you’d expect. Open the preferences and save a configuration that includes system audio from a single app, hides desktop icons, and sets the cursor to loop. That way, every quick demo you shoot comes out with the same consistent look, and you’re not fiddling with checkboxes when someone asks for a five-second explanation on Slack.
Next, get comfortable with the transcript feature. After a short test recording, let Screen Studio generate the transcript locally and skim through it. You’ll notice it’s accurate enough to use as a rough edit guide: find a section of waffle in the text, drag across the corresponding part of the timeline, and cut it. That’s faster than scrubbing through a waveform. If you’re planning a tutorial, try recording the voiceover separately — speak your steps aloud, then use the transcript to mark where each zoom or emphasis should land before you even touch the timeline handles.
One more habit worth forming early: name your recordings immediately after stopping. The default titles are generic timestamps, and by day three you’ll have a dozen of them. A quick descriptive name — “figma-export-menu” or “api-error-demo” — turns the library from a puzzle into a searchable archive. Combine that with the shareable-link option when sending drafts to a colleague, and you skip the whole export-and-attach dance entirely.
How Screen Studio fits with other apps and macOS
Screen Studio doesn’t replace your existing tools; it slots between them. You might sketch a wireframe in Figma, record a walkthrough in Screen Studio, and paste the result directly into a Notion page — all without a single file hitting the desktop. The clipboard export is the glue here: it understands that most short screen recordings are destined for a chat window or a task comment, not a video library.
macOS integration goes deeper than you’d first notice. The app respects your Focus modes — if you’re set to Do Not Disturb, it won’t ping you with notifications mid-recording. It reads your microphone permissions exactly as granted in System Settings, so the same mic routing you use for FaceTime calls applies here, no separate configuration. When you connect an iPhone or iPad via USB, Screen Studio picks up the device’s model and colour through the same system frameworks that Finder uses, which means the device mockup in your recording matches the hardware sitting on your desk — right down to the shade. Keyboard shortcut recording taps into the macOS input monitoring layer, so even complex combinations with multiple modifiers show up cleanly as small on-screen badges.
For audio, the ability to capture system sound from only selected apps is worth understanding early. If you’re recording a browser demo but have music playing in the background, you can tell Screen Studio to listen to the browser alone. That’s a rare trick on macOS — most recorders grab the entire system mix — and it means you can keep your workspace humming while producing clean tutorial audio. The background noise removal and volume normalisation happen post-recording, so the raw capture stays untouched; you can always revert if the automatic cleanup gets too aggressive on a quiet voice.
Workflow: recording a product feature demo
Here’s how a typical feature demo comes together, from blank screen to polished shareable link. The goal is a 90-second walkthrough of a new settings panel in a web app, complete with voiceover, cursor emphasis, and a clean vertical export for social media.
First, prepare the environment. Open the web app to the page just before the feature, hide your bookmarks bar, and turn on the desktop-icon hiding option in Screen Studio’s recording controls. Connect your USB microphone and do a quick test clap — check the level meter, then forget about it; normalisation will even things out later. Select system audio from the browser only, so a background Slack ping doesn’t sneak into the mix.
Start recording and talk through the feature as you click. Don’t pause for mistakes — keep going. Screen Studio tracks your cursor movements and zooms automatically, but you’re not locked into its choices. Stop the recording and open the timeline. The automatic zooms appear as draggable blocks; find the moment where the app zoomed into a dropdown menu but missed the important sub-item. Drag that zoom block a few frames earlier, and adjust its crop rectangle slightly lower. The motion eases smoothly across the edit — no jump cuts.
Now the cursor. The pointer was static while you explained a concept, so select that section on the timeline and hide the cursor with an animated fade. For the moment where you clicked the “save” button, increase the cursor size temporarily so it’s impossible to miss. Turn on cursor looping near the end so the pointer returns to centre as the video closes — a small touch that makes the final frame feel intentional.
With the visual edit locked, switch to audio. Normalise the voice volume and apply noise removal. The raw recording had a slight hum from an air conditioner; it’s gone now, and your voice sits at a consistent level. Generate the transcript and scan it for any rambling sentences. Find one, cut the corresponding video segment, and the timeline ripple-adjusts everything downstream.
For export, set the format to vertical with automatic scaling — the app re-frames the horizontal capture into a portrait shape, keeping the focused element centred. Choose 4K at 60fps for sharpness. Instead of saving a file, create a shareable link. Paste that link into your team’s chat. Total elapsed time from idea to shared video: under eight minutes.
Twice a week she records support walkthroughs for the internal wiki
Maya runs onboarding sessions for a SaaS company. Twice a week she records short walkthroughs of common support scenarios — password resets, dashboard navigation, export settings — and drops them into the internal wiki. Before Screen Studio, each video meant recording in one app, editing in another, and exporting a file that was always too large for the wiki’s upload limit.
Her morning now starts with a USB-connected iPad showing the customer-facing mobile interface. Screen Studio detects the device model and frames it automatically. She records three scenarios in a row, stopping after each. For the first one, the automatic zoom followed her perfectly; she copies it to the clipboard and pastes it straight into the wiki editor. For the second, she drags a manual zoom onto the timeline to highlight a small settings icon the auto-zoom had passed over. For the third, a longer piece on export options, she uses the transcript to chop out a section where she repeated herself, then exports it as a shareable link because the file would exceed the wiki’s cap.
By the time her first coffee has cooled, three videos are live. She didn’t open a separate editor, didn’t name a single file on disk, and the cursor was always visible exactly where her trainees needed to look. The automatic noise removal handled the open-office chatter behind her. That’s the shift: from video production as a separate task to video explanation as an extension of typing.
Sits quietly in the menu bar and keeps the processor cool during recording
On a MacBook Air with Apple Silicon, Screen Studio opens in under three seconds and sits quietly in the menu bar using negligible CPU when idle. During a recording at the default quality, the processor stays cool — the app leans on the hardware media encoders built into Apple’s chips, so a ten-minute screen capture barely nudges the battery graph. Memory usage hovers around 400–500 MB during an active recording with the selfie overlay and system audio enabled, which leaves plenty of headroom for the app you’re actually demonstrating.
Export is where the engineering shows. A five-minute 4K recording with normalised audio and noise removal exports in roughly real time on an M-series machine — five minutes of video takes about five minutes to process. The local transcript generation is faster; a three-minute speech-heavy clip finishes in under thirty seconds because it runs entirely on-device without network round trips. The timeline stays responsive even during those background exports, so you can start editing the next recording without waiting.
Stability in daily work is solid. Over weeks of use across multiple macOS updates, the app hasn’t dropped a recording or corrupted a timeline. The only quirk worth knowing: if you’re recording system audio from a specific app and that app quits unexpectedly, Screen Studio pauses the audio capture gracefully rather than crashing or saving a silent file. It’s the kind of thoughtful handling that keeps a tool in your dock rather than in the “tried once” folder. For anyone searching for a screen studio macos solution that stays out of the way until needed, this one earns its keep by being boringly reliable — and that’s a compliment.
- macOS 13 or later
- Works on both Intel and Apple Silicon Macs
- Interface: English
Questions I keep hearing
Can I change the cursor size after I've finished recording?
Yes, you can adjust the cursor size and apply a fade-out animation to a static cursor directly from the editor after the recording is complete.
Does it work with an iPhone or iPad connected to my Mac?
It does. When you record from a connected iOS device, Screen Studio can automatically detect the device model and colour for a clean, framed capture.
What's the highest export quality available?
Screen Studio can export video at up to 4K resolution running at 60 frames per second.
Questions from the class 0
Sign in or join the class to ask a question.
Nobody has asked anything yet. If you have used it on a real job, say what the file did.
Also on the Mac Apps shelf
The whole Mac Apps shelf ScreenFlow
Captures and edits screen recordings, then turns your clicks and taps into animated callouts.
ScreenFlow
Captures and edits screen recordings, then turns your clicks and taps into animated callouts.
 Sensei
Shows you exactly what your Mac is doing right now and helps you tidy it up.
Sensei
Shows you exactly what your Mac is doing right now and helps you tidy it up.
 Session Pomodoro Focus Timer
Times your work blocks and breaks so you can concentrate on one thing at a time.
Session Pomodoro Focus Timer
Times your work blocks and breaks so you can concentrate on one thing at a time.
 RightFont
Manages and previews fonts directly from the menu bar.
RightFont
Manages and previews fonts directly from the menu bar.
 Rider
Builds .NET and Unity projects in a cross-platform IDE.
Rider
Builds .NET and Unity projects in a cross-platform IDE.
 Shadowrocket
Routes your network traffic through different proxies based on rules you set up.
Shadowrocket
Routes your network traffic through different proxies based on rules you set up.
 Rhino
Models precise 3D forms for design and manufacturing.
Rhino
Models precise 3D forms for design and manufacturing.
 Sidebar
Lets you peek at every open window by hovering over an app in your Dock.
Sidebar
Lets you peek at every open window by hovering over an app in your Dock.