 ASPNetWorld

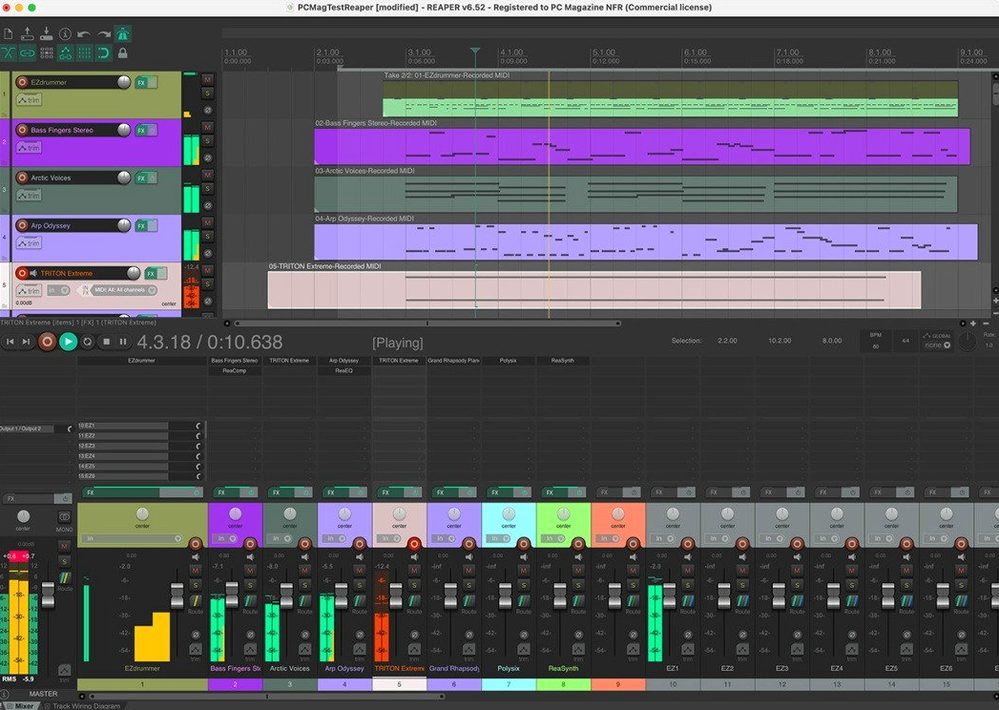
REAPER is a complete digital audio workstation that turns a computer into a multitrack recording studio when paired with an audio interface and a microphone. It gives you the tools to record a solo performance, capture a full band, or arrange a complex orchestral score, all within a single, adaptable environment. The application handles audio and MIDI with equal depth: you can import existing clips, synthesize new sounds from scratch, and build arrangements that grow from a rough idea into a polished master. A single version serves everyone from voiceover artists to professional mix engineers, so the workflow you learn is the same one used at every level of production.
- Multitrack recording and editing: Record audio and MIDI side by side, then edit takes with tools for trimming, crossfading, and comping the best moments from multiple passes.
- MIDI routing on a grand scale: The software supports up to 128 MIDI input and output hardware devices, plus loopback paths, so you can drive a room full of synthesizers or route complex virtual-instrument setups without running out of ports.
- Built-in processing and mixing: Every track gets its own chain of effects, from surgical EQ to lush reverbs. Mixing happens in a familiar console view with sends, groups, and automation that remembers every fader move.
- Arranging and composing: Move beyond linear recording by assembling sections, layering sampled instruments, and using MIDI editing tools that treat notes like words in a paragraph — select, copy, and reshape musical ideas quickly.
- Mastering output: After the final mix, REAPER provides the metering, limiting, and dithering tools needed to prepare a finished stereo file that translates well to streaming platforms and physical media.
What ties these features together is the sense that the software adapts to your project rather than forcing you into a rigid method. A podcast episode, a film score, and a rock album all find a home here, and the application stays out of the way until you reach for the next tool.
Imagine a composer who splits their week between scoring short films and producing a podcast for a local history museum. On Tuesday they are layering string libraries and a recorded cello part against a locked picture; on Thursday they are editing an interview with an archaeologist. In most DAWs these two projects would feel like completely different applications, each with its own template and mental overhead. In REAPER they open inside the same window, sharing the same keyboard shortcuts, the same track-routing logic, and the same undo history. The composer keeps a single portable install on a USB drive for moving between the studio Mac and a laptop on location. When the museum asks for a version with timecode-accurate chapter markers, they add markers to the ruler during playback and REAPER embeds them in the rendered MP3 without a separate tagging pass. No format-hopping, no supplemental utility, just the tool they already have open.
A walk through vocal comping and pitch correction
Here is a workflow for assembling a lead vocal from half a dozen takes and nudging the tuning into shape, all without leaving the arrange view.
- Record or import your vocal takes onto a single track. Each take stacks as a lane inside the track, visible when you toggle Options > Show all takes in lanes (when room) — this stops you scrolling through takes blind and lets you scan them at a glance.
- Select the track and press T to enable Take mode for the mouse. Now you can swipe across any phrase in any lane to hear it immediately. Click a segment to promote it to the active take; REAPER crossfades the boundaries automatically.
- If a phrase sits a little flat, select it and open ReaTune from the track’s FX chain. Switch to the Manual correction tab, draw a blue target line at the centre of the desired pitch, and the plug-in pulls the note up transparently. The Automatic tab works faster for background stacks, but manual lines give you per-note control for a lead line.
- Once the take is assembled and tuned, glue the items together (⌘⌥G) so the edited comp becomes a single continuous file ready for mixing. The original takes stay in the project bay if you ever need to revisit the raw material.
Speed, stability and a light footprint
A fresh project with sixty audio tracks, a dozen instances of ReaEQ, and a convolution reverb on a send sits comfortably inside 2 GB of RAM on an Apple Silicon machine. The application launches in under three seconds from an NVMe drive, and closing the last project window returns you to a blank desktop without the shell hanging around consuming resources. During tracking sessions with a 32-sample buffer, round-trip latency hovers low enough that performers monitoring through the DAW rarely notice a delay, provided the interface drivers are well-written. Crash logs are genuinely rare; the twelve-year-old codebase has been ironed out across enough hardware configurations that the common failure points — dodgy third-party plug-ins — are quarantined in a sandboxing system that lets REAPER carry on running while isolating the misbehaving .vst or .au.
On the CPU side, anticipative FX processing renders ahead of the playback cursor on idle cores, so projects that would stutter in a strictly real-time engine run smoothly even when the meter is nudging 70%. The visual interface remains responsive during heavy automation passes, and the arrange window redraws waveforms as fast as you can zoom with a trackpad.
Steer your first week by remapping mouse modifiers first
When an app does this much, the sensible approach is to steer the first week rather than let the feature set steer you.
- Customise the mouse modifiers. Open Preferences > Editing Behavior > Mouse Modifiers and assign behaviours by context: track, media item, ruler, envelope. Spend twenty minutes here and you will edit audio faster than in any DAW where the mouse rules are fixed.
- Build a default project template. Set up a few colour-coded tracks, a reverb send, a basic monitoring chain on the master bus, and save it as the default. Every new project then inherits a starting point that reflects how you actually work.
- Learn the routing matrix. The matrix view (⌥R) shows every connection at once: hardware inputs to tracks, tracks to master, sends to effects. It is faster than poking through individual track I/O menus when you need to reconfigure a complex setup, and it teaches you the folder-track logic visually.
- Right-click everything. REAPER buries a startling amount of power in context menus. Right-click a fader to change its curve, right-click a pan knob to pick a pan law, right-click a record-arm button to set input monitoring. The habit pays off within the first hour.
How REAPER fits with other apps and macOS
Under the hood, REAPER talks to the operating system in ways that make it a cooperative citizen rather than a walled garden. Audio can be piped in and out via BlackHole or Loopback, so you can record the output of a web browser into a track or send REAPER’s stereo mix to a streaming encoder without a physical cable. MIDI over IAC Driver lets you route between REAPER and other instruments running stand-alone, such as a modular synth environment or a notation program that understands real-time MIDI input. The media explorer supports drag-and-drop from the Finder, and you can drop an .rpp project file straight into a running instance to import its tracks without opening a second window.
Video support means you can import a reference movie from Final Cut Pro or DaVinci Resolve, nudge the audio and music into sync, and export stems with timecode embedded in the file names — all without leaving the mixing environment. On the more scriptable side, the ReaScript API can read and write files to arbitrary locations, so a Lua script could batch-process audio files from a shared network folder overnight while the Mac idles. Users who search for a reaper daw torrent often discover that the application’s real advantage is this mesh of interoperability rather than any single headline feature, because once you connect it to the rest of your toolkit, it becomes harder to imagine swapping it out.
Apple Silicon builds run natively and the Universal binary means no Rosetta penalty. Audio Units load directly as ARM code if the plug-in developer provides a native build, while Intel-only plug-ins bridge automatically. The bridging is unobtrusive: a tiny indicator appears in the FX window but the sound and automation pass through as normal. For those grabbing a reaper mac torrent to try on a second machine, the portable-install option lets you keep the entire application bundle, preferences, and licence file on an external SSD that moves between a desktop Mac and a MacBook without leaving configuration fragments behind.
- macOS 10.15 or later
- Apple Silicon or Intel processor
Questions from the class 0
Sign in or join the class to ask a question.
Nobody has asked anything yet. If you have used it on a real job, say what the file did.
Also on the Audio shelf
The whole Audio shelf Cubase
Provides a musical workspace that keeps up with an arrangement as fast as you can imagine it.
Cubase
Provides a musical workspace that keeps up with an arrangement as fast as you can imagine it.
 Cycling '74 Max
Lets you build your own instruments and effects by connecting visual objects with virtual patch cords.
Cycling '74 Max
Lets you build your own instruments and effects by connecting visual objects with virtual patch cords.
 Boom 3D
Reshapes your Mac's entire output with an equaliser, a volume boost, and spatial widening.
Boom 3D
Reshapes your Mac's entire output with an equaliser, a volume boost, and spatial widening.
 Bitwig Studio
Gives producers a sandbox for recording, sound design, and live performance with modular freedom.
Bitwig Studio
Gives producers a sandbox for recording, sound design, and live performance with modular freedom.
 djay Pro
Mixes tracks, samples, and video on a pair of software decks that grow with your skill.
djay Pro
Mixes tracks, samples, and video on a pair of software decks that grow with your skill.
 Dorico Pro
Engraves fully notated scores with the structural clarity of a modern DAW.
Dorico Pro
Engraves fully notated scores with the structural clarity of a modern DAW.
 Audiobook Builder
Joins dozens of audio files into a single, properly chaptered audiobook with cover artwork.
Audiobook Builder
Joins dozens of audio files into a single, properly chaptered audiobook with cover artwork.
 Audio Hijack
Routes any Mac audio into a recording and can transcribe it to searchable text.
Audio Hijack
Routes any Mac audio into a recording and can transcribe it to searchable text.