 ASPNetWorld
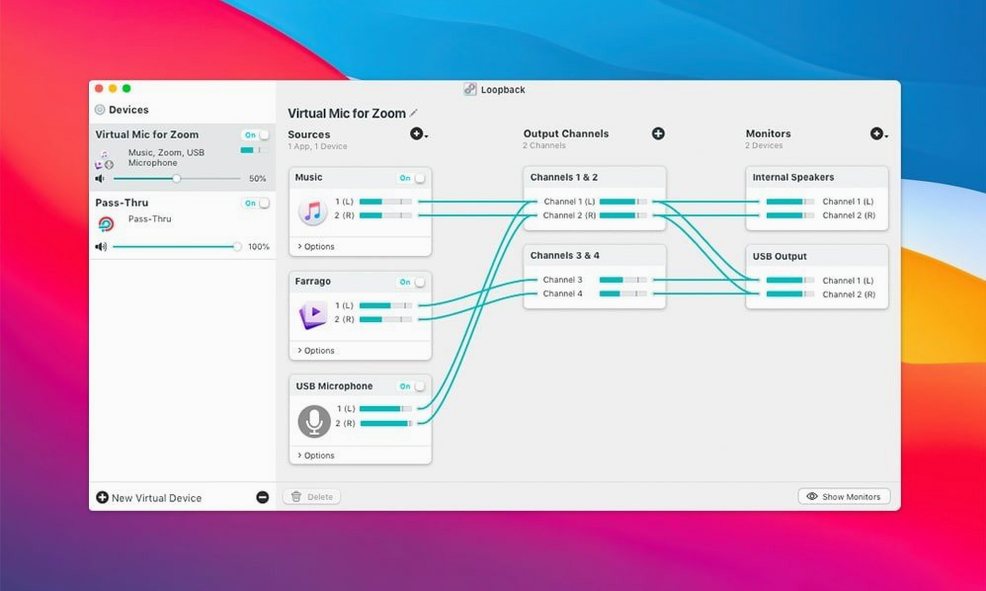
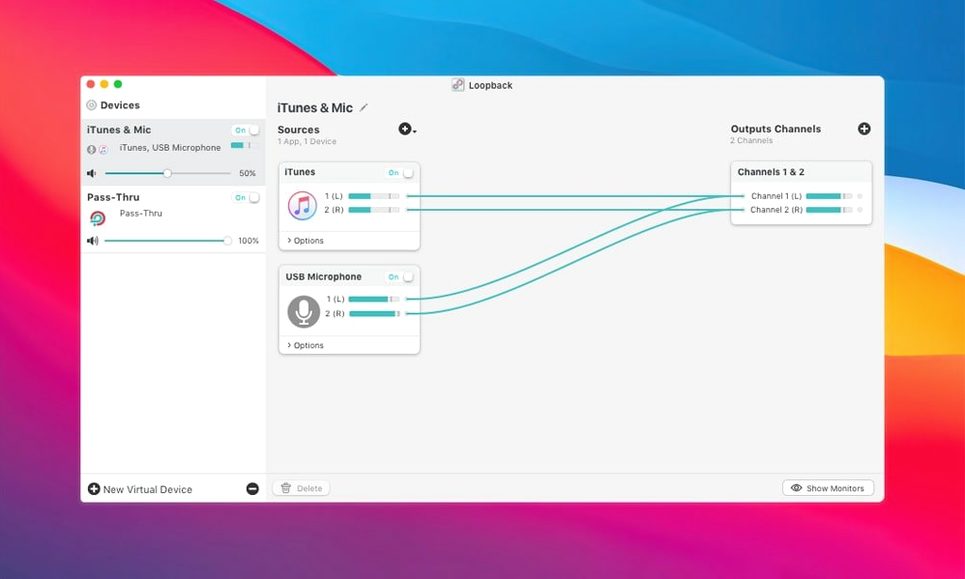
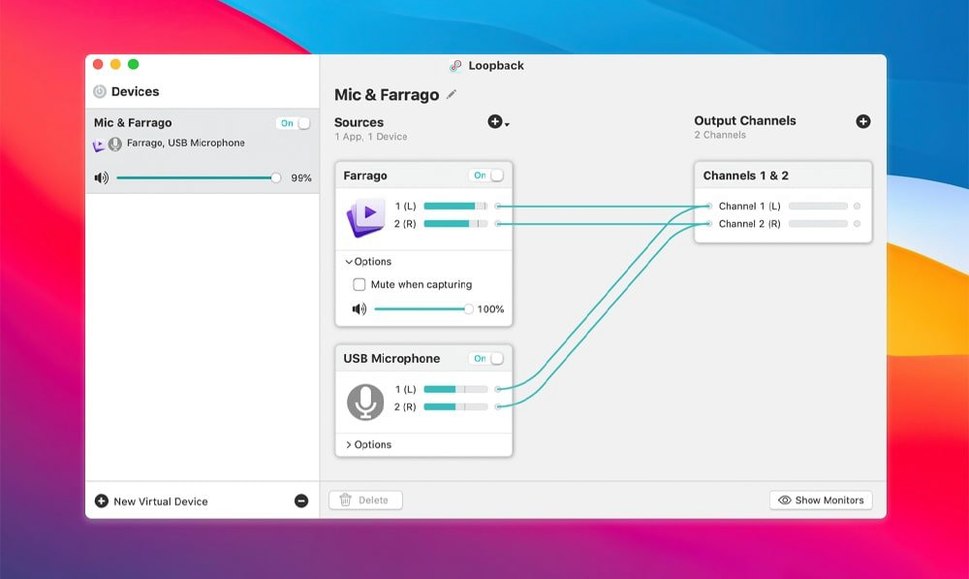
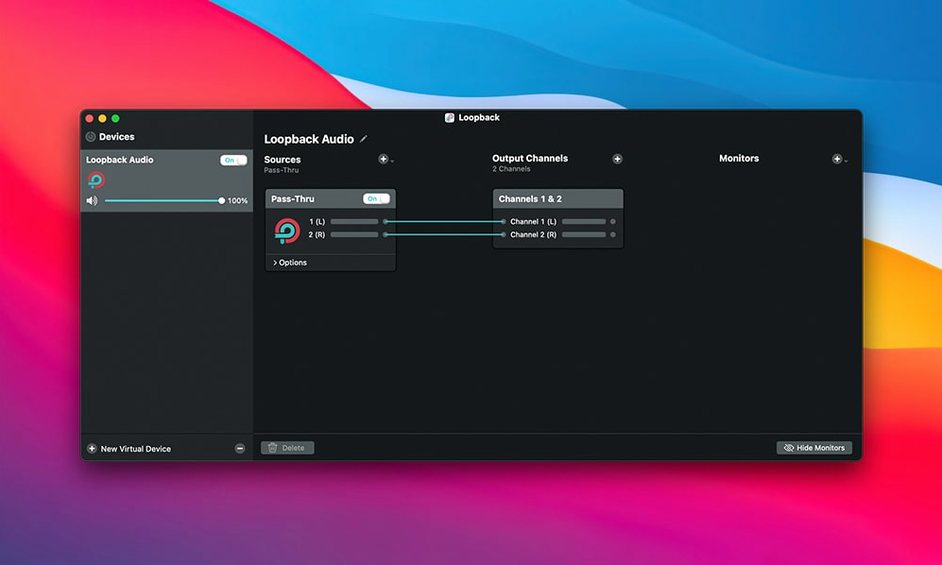
If you've ever used Audio MIDI Setup to create an aggregate device, you know the knot of frustration that comes with it. Loopback is the antidote. It swaps that fiddly, breakable utility for a calm, wired interface where you just draw connections between your sources and a new virtual device. That device then appears in any app you like, no dark magic required.
The first thing to try is the simplest combination: your microphone and your music player. Add your physical mic as a source, pop in an application source like Music or Spotify, and give it a name like 'Mic + Tunes'. Set this as the microphone in a Zoom call or Voice Memos, and suddenly you're talking over a clean, perfectly levelled backing track without the other person hearing a tinny speaker bleed.
Next, explore what happens when you treat your whole desk as a single source. Rather than picking between a USB headset and a desktop condenser mic, drag both into a single Loopback device. Call it 'Desk Voice'. Now your recording software sees one stable input, even if you physically swap mics mid-sentence.
Streamers often use this trick, combining a game's audio, a music app and a talkback mic into one neat channel for OBS. It's the kind of routing that would normally need a physical mixing desk, but here it's just a few virtual cables. The real joy is that once you've built it, every app on the Mac sees it as a genuine audio device, not a workaround.
A podcaster's morning rescue
Picture a freelance journalist who records interviews over Zoom, grabs clips from YouTube for a radio segment, and occasionally pulls sound effects from a browser-based board. Before Loopback, her mornings were a tangle of cables and prayer. The USB mic worked for Zoom but not for recording the browser, so she'd play a clip and lean the mic toward the speakers, wincing at the room echo. The moment she switched to a Loopback device named 'Interview Desk', that nonsense stopped. One virtual device carries her Rode mic, Zoom's incoming voice and Safari's audio, all levelled and clean. She opens Audition, selects 'Interview Desk' as the input, and records everything as a single track. No rerouting, no repatching. When a guest cancels and she needs to record a voiceover over a clip from YouTube, she just mutes the Zoom source and carries on. That one device, built once on a Tuesday, has quietly replaced half a dozen ad-hoc fixes.
First days with Loopback
On day one, resist the urge to build a masterpiece. Start with one source and one output, just to feel how the wiring works. Add your physical microphone, click the plus button, choose your mic from the list and give the device an obvious name like 'Test Mic'. Open System Settings, go to Sound, and select 'Test Mic' as the input. Speak. You'll see the level meter twitch. That's it — the loop is closed.
Once that confidence settles in, try muting and soloing sources. Each source block has a little speaker icon; click it to mute, option-click to solo. In the first week, this is your best friend. Solo a source to trace where a mysterious hum is coming from. Mute your mic while you play a sound effect from Music, then unmute to talk over the tail. It's the audio equivalent of putting your finger on a page to keep your place, and it stops you tearing down a whole device just to find a gremlin.
Another early habit worth forming: rename your devices carefully. The name you type in Loopback becomes the device name system-wide, so 'Loopback Audio 1' tells you nothing in OBS six months later. Call it 'Podcast Full Mix' or 'Screen Record with Mic'. Your future self, staring at a dropdown list of twelve identical-looking entries, will thank you.
Also, check the 'Pass Thru' button on each source. It's the small icon that looks like a straight arrow. When it's on, the source's audio still reaches its normal destination — your speakers, your headphones — as well as your Loopback device. When it's off, the audio is captured silently. For a screen recording where you want to hear the video's sound while you capture it, leave Pass Thru on. For a Zoom call where you don't want the caller to hear their own voice echoing back, turn Pass Thru off on the Zoom source. This single toggle prevents the most common first-week headache: feedback loops that sound like a banshee in a tunnel.
Virtual devices stay live until you delete them
The most frequent slip is forgetting that Loopback devices are always on once created. Unlike a physical cable you unplug, a virtual device sits there quietly capturing audio whether you're using it or not. New users sometimes leave a device running with a mic source wide open and then wonder why their Mac's fan kicks in during a quiet afternoon. If you're not using a device, either delete it or click the power button at the top of its window to switch it off. Think of it like a lamp in an empty room.
Another classic stumble is creating a device that captures its own output. Imagine you build a device that includes Safari as a source, then set that same device as the system output. Safari plays audio into the device, which plays it out, which Safari picks up again, which feeds back in. The result is a screaming crescendo that'll have you ripping headphones off. The fix is simple: never set a Loopback device as your system output unless you've deliberately designed a monitoring chain and you know exactly which sources have Pass Thru enabled.
Beginners also tend to pile on too many sources at once, layering five apps and three mics into a single device before checking levels. The meters in Loopback are your truth-teller here. Watch them. If a source is clipping into the red, pull its fader down before you wonder why your recording sounds like gravel. The virtual wiring is clean, but digital clipping is just as ugly as analogue distortion.
Finally, there's the quiet trap of forgetting that some apps grab an audio device exclusively. A DAW like Logic might latch onto your Loopback device and refuse to share it with another app. If you're wondering why Zoom can't see your device while Logic is open, check Logic's audio preferences and release the device, or build a second Loopback device for the other app. Two devices cost nothing.
Launching Loopback first prevents stream-day chaos
It's Thursday evening and a streamer is about to go live on Twitch with a retro-gaming session. She opens Loopback first, before anything else — a habit that saves fiddling later. Her device is already built from a previous session: it's called 'Stream Mix' and contains three sources: the stereo output from her game emulator, a Spotify app source for background music, and her USB microphone. She checks the meters as she speaks, watching the mic's green bars dance comfortably below the red. The music source is muted for now; she'll unmute it during the 'waiting' screen.
Next she opens OBS. In the audio settings, she sets 'Stream Mix' as the desktop audio device. No separate mic input, no desktop audio capture — just one device carrying everything. She adds a video capture of the emulator window, tweaks the layout, and checks the audio sync by tapping the mic and watching the OBS meter respond instantly. There's no delay because Loopback isn't adding any processing, just routing.
She launches the emulator and the game's chirpy 16-bit soundtrack fills her headphones. In Loopback, she adjusts the emulator source's level so it sits just under her voice, a trick she learned after three streams where the music drowned out her commentary. She unmutes Spotify and drops its fader to a whisper, a bed of lo-fi underneath the game audio. The whole mix — three distinct sources, each with its own level — arrives in OBS as one clean signal.
Mid-stream, a viewer asks her to demonstrate a glitch. She needs to switch from the emulator to a browser showing a tutorial video. In Loopback, she adds a new source: Google Chrome. She mutes the emulator source, unmutes Chrome, and the transition happens without OBS even noticing. The 'Stream Mix' device hasn't changed; it's still the same device OBS is listening to, but what's inside it has shifted. The stream doesn't drop, the audio doesn't pop, and the viewer gets their answer. She mutes Chrome, unmutes the emulator, and carries on. The whole swap took eight seconds.
After the stream, she opens the Loopback window and clicks the power button on 'Stream Mix' to switch it off. The virtual cables go quiet. Tomorrow she'll build a different device for a podcast recording, probably reusing the microphone source and adding a Zoom source from a scheduled interview. The emulator source will sit unused until next Thursday, but it's there if she needs it.
Loopback among other apps and macOS features
Loopback doesn't live in isolation. It works alongside Audio Hijack, its sibling from Rogue Amoeba, in a way that feels almost symbiotic. Build a device in Loopback — say, a mix of Safari audio and a microphone — and then set that device as the input source in Audio Hijack. Audio Hijack can apply effects, record to a file, or stream it onward. The two apps share the same underlying audio engine, so latency stays low and the signal path remains clear. It's a tidy division of labour: Loopback handles the routing, Audio Hijack handles the processing and capture.
On the macOS side, Loopback devices show up in System Settings under Sound, exactly like a physical USB interface. This means you can use them for system-wide alerts, for Siri's voice input, or as the default input for FaceTime. If you've ever wanted to play a sound effect into a FaceTime call without holding your phone up to the Mac's speakers, a Loopback device containing Music and your mic makes it trivially easy. Just set the device as the input in FaceTime's video menu.
ScreenFlow and QuickTime Player also benefit directly. When you record a screen with QuickTime and need to capture both the system audio and your voice, the built-in options are famously anaemic — QuickTime can either record the mic or nothing. Point it at a Loopback device that merges your mic and the app you're demonstrating, and suddenly QuickTime is a competent screencasting tool. The same trick works in ScreenFlow, where the Loopback device appears as a single audio source alongside the screen recording track, saving you a sync headache in post-production.
For musicians who use a DAW like Logic or Ableton Live, Loopback can route a live mix into a Zoom call for remote collaboration. Build a device that captures the DAW's output and a talkback mic, then set it as Zoom's microphone. Your collaborator hears your music and your voice in perfect sync, without the degraded quality of a speakerphone setup. It's a trick that became essential during the remote-recording boom, and it's still the cleanest way to share high-quality audio over a consumer video-call app.
One final harmony worth mentioning: Loopback devices work with macOS's built-in Aggregate Device feature, though you'll rarely need to combine them. If you already use an Aggregate Device in Audio MIDI Setup to group two physical interfaces, you can add a Loopback device to that aggregate for even more routing flexibility. But in most cases, Loopback's own interface makes that step redundant — why build an aggregate in a fiddly utility when you can just add both interfaces as sources in Loopback's calm, wired canvas?
Version 2.5.0 is a quiet but crucial upkeep release, built to keep Loopback at home on the newest Macs. It lays a proper foundation for macOS 27 and tidies up a few lingering housekeeping items.
- Full support for macOS 27, so the app runs without any compatibility bumps.
- That slightly unnerving launch warning on macOS 27 is now gone for good.
- The ARK audio-handling plugin was refreshed to version 13.5, keeping the virtual wiring stable under the hood.
- macOS 11 or newer, including macOS 27
- Runs on both Intel and Apple Silicon Macs
- Interface presented in English
Questions I keep hearing
Can Loopback combine my microphone with audio from an app?
Yes, that's one of its core jobs. You can blend a physical mic with any application's sound and present the mix as a single microphone input for chat or recording apps.
Does the current version support the latest macOS?
Loopback 2.5.0 adds full support for macOS 27, and it no longer shows a warning when you launch it on that system.
What is the ARK plugin mentioned in the update?
It's the behind-the-scenes audio handling engine from Rogue Amoeba. Version 13.5 was included with the 2.5.0 update, ensuring the routing works reliably.
Questions from the class 0
Sign in or join the class to ask a question.
Nobody has asked anything yet. If you have used it on a real job, say what the file did.
Also on the Audio shelf
The whole Audio shelf Loop Mash Up Pro
Lets you stack royalty-free loops from a curated library into full musical arrangements.
Loop Mash Up Pro
Lets you stack royalty-free loops from a curated library into full musical arrangements.
 Logic Pro
Records, arranges and mixes whole songs with instruments and loops built in.
Logic Pro
Records, arranges and mixes whole songs with instruments and loops built in.
 MainStage
Turns your Mac into a live rig for playing instruments and effects.
MainStage
Turns your Mac into a live rig for playing instruments and effects.
 Kontakt
Hosts thousands of sampled instruments that you play from a MIDI keyboard inside your DAW.
Kontakt
Hosts thousands of sampled instruments that you play from a MIDI keyboard inside your DAW.
 Maschine
Builds beats and launches loops from a hardware controller.
Maschine
Builds beats and launches loops from a hardware controller.
 iZotope Ozone
Listens to your mix and builds a complete mastering chain from EQ to limiting.
iZotope Ozone
Listens to your mix and builds a complete mastering chain from EQ to limiting.
 iReal Pro
Generates a backing band that plays along to the chord chart you type on screen.
iReal Pro
Generates a backing band that plays along to the chord chart you type on screen.
 Native Instruments Reaktor
Gives you a workbench to build your own synths and effects from oscillators, filters, and envelopes.
Native Instruments Reaktor
Gives you a workbench to build your own synths and effects from oscillators, filters, and envelopes.