 ASPNetWorld

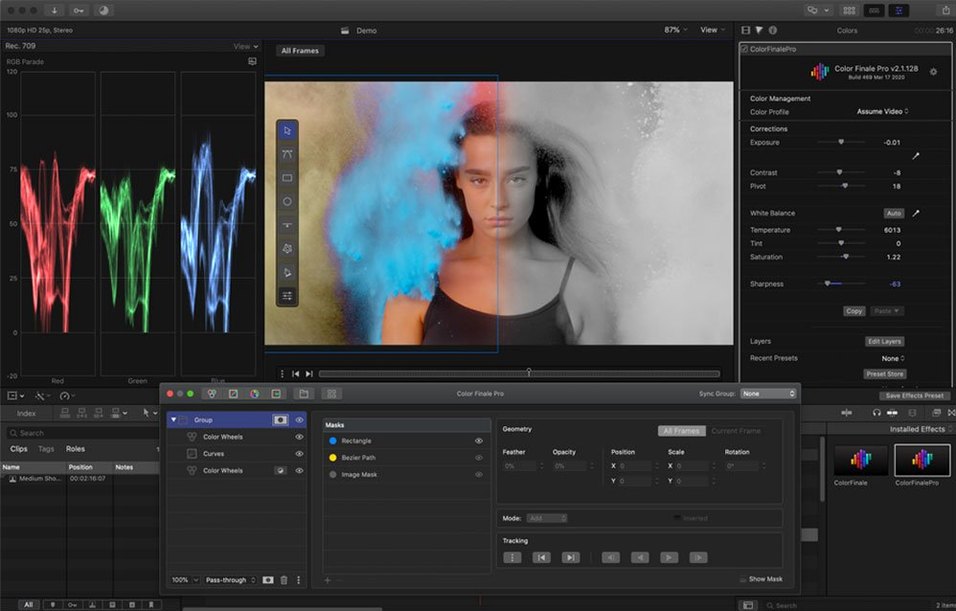
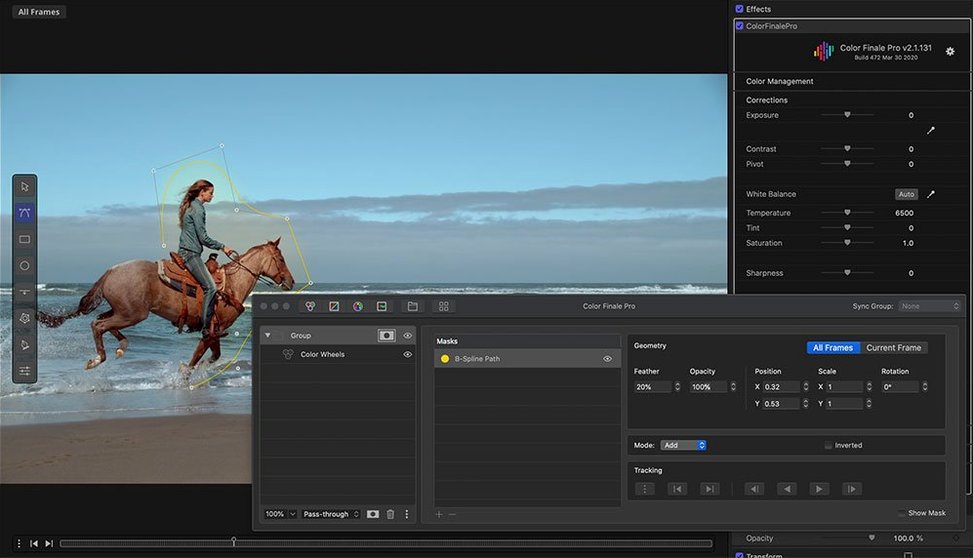
Drops into Final Cut Pro and Motion without adding friction
Color Finale runs on Intel Macs from macOS 10.12 onwards. It drops straight into Final Cut Pro X and Motion as a standard video effect, so if your Mac handles those applications comfortably, the plugin won't add any friction. Apple Silicon machines can run it under Rosetta 2, though a native build hasn't appeared yet.
A colourist's workflow, control by control
Start with the colour wheels. They work like the lift, gamma, and gain rings on a hardware panel — drag the centre point toward a hue and the shadows, midtones, or highlights shift in that direction. It's the fastest way to pull a cold, flat shot back toward a warm evening feel without touching a curve.
Next, reach for the primary colour vectors. Think of these as hue-specific saturation and brightness dials. If the talent's red jumper is bleeding into the shot, a quick pull on the red vector's saturation knob reins it in without desaturating the skin tones. The vectors give you six colour targets, and each responds like a fader on a mixing desk — immediate and musical.
The real power comes when you save your work as a preset or a LUT. Color Finale can author and export LUTs directly, which means a grade you built for a sunlit interview can travel to your LUT Utility and land on every clip from that location. It turns the plugin into a look-development tool as much as a correction tool.
Ignoring lift, gamma, and gain controls makes grading a fight
Most people open Color Finale, spin a colour wheel, and think they're grading. What they're actually doing is fighting the interface with one hand tied behind their back. The single biggest mistake I see in my evening classes is ignoring layer order. Color Finale stacks adjustments from top to bottom, and a saturation boost placed above a contrast curve behaves very differently from one placed below it. If your shadows suddenly look like crushed velvet, swap the layers before you touch another dial.
Another classic blunder is over-driving the vectors. A student will spot green grass that looks a bit anaemic, push the green vector's saturation to 80, and then wonder why the entire frame has developed a plastic sheen. The vectors are surgical tools, not volume knobs. Start at 10, nudge in increments of five, and keep one eye on a skin-tone patch — red and yellow vectors are notoriously easy to graze when you're chasing foliage.
The LUT export catches people too. You build a gorgeous grade, hit Export LUT, and drop it onto a different clip only to find the contrast has gone feral. That happens because your original grade included a curves adjustment clipped to the log footage, and the new clip is already Rec.709. Always check your working colour space before you author a LUT, and consider whether the exported cube should carry the full stack or just the colour-only layers.
Finally, beginners often leave the Color Preset Store untouched, assuming presets are cheating. They're not — they're reverse-engineering gold. Load a preset, step through every layer, and watch how a professional colourist built the look. You'll learn more in ten minutes of deconstruction than in an hour of wheel-spinning.
Won't slow your timeline if your Mac already handles FCP
One question lands in my inbox more than any other: does the plugin slow Final Cut Pro to a crawl? The short answer is no, not if your Mac already meets the timeline performance you expect. Color Finale processes on the CPU rather than hammering the GPU, so on older Intel machines — particularly dual-core MacBooks — stacking six or seven layers per clip will eventually make the playhead stutter. For most edits with two to four correction layers, you won't notice a thing. Proxy workflows help enormously if you're grading multicam.
People also ask whether Color Finale works with the free trial of Final Cut Pro. It does, provided the trial version supports third-party video effects, which it has done since FCP X 10.4. The plugin appears in the effects browser exactly as it would in a full installation. No feature locking, no watermark from the plugin side.
Another recurring question is about the separate Color Finale application that sits in your Applications folder. It's not a standalone editor — it's a helper that manages licensing and colour-science processing for the plugin. You don't launch it to grade; you just let it exist. Opening it once after installation is enough to satisfy the macOS framework, and it can stay closed forever after that.
Some editors hunting for a color finale 2 free download wonder whether the plugin can live alongside other FCP effects without conflicts. It can. Color Finale sits happily next to built-in tools, third-party LUT loaders, and even older versions of itself — though I'd always recommend removing previous versions before installing 2.2.8, purely to keep the effects menu tidy.
Adds layered adjustments and HSL curves beyond Apple's three wheels
Compare it to Final Cut Pro's built-in Colour Board and the difference is immediate. Apple's native tool gives you three wheels and basic curves, which is enough for a quick balance pass. Color Finale adds vectors, HSL curves, layered adjustments, and LUT authoring — the Colour Board is a sketchpad; Color Finale is a full painting rig. If you're delivering to broadcast or building a consistent look across a series, the gap between the two becomes unbridgeable by the second episode.
Sit it next to DaVinci Resolve and the conversation shifts. Resolve's colour page remains the benchmark for dedicated grading — node-based, panel-friendly, and absurdly deep. Color Finale doesn't try to outgun it; it tries to keep you inside Final Cut Pro. That matters when your edit is still fluid, when picture lock hasn't happened, and when round-tripping to Resolve would cost you an afternoon you don't have. For a documentary editor who needs to sweeten interviews before a rough cut screening, Color Finale saves the export-import-export dance.
Then there's MotionVFX mLUT, a popular lighter-weight LUT loader for FCP. mLUT excels at applying and previewing LUTs quickly, but it stops at LUT management. Color Finale folds that LUT Utility into a broader correction toolkit — you can apply a LUT, then push the shadows cooler with a wheel, isolate a hue with vectors, and save the whole stack as a new LUT. mLUT is a playback device; Color Finale is a production line.
For anyone who's searched for a color finale torrent hoping to test the full feature set before committing, it's worth knowing that the plugin's layered architecture is what separates it from simpler free utilities. A basic LUT applier won't teach you vector isolation or HSL curve blending — the learning curve itself is the value, so once you have the build, dive straight into the Vectors panel to see where the real magic lives.
Switch scopes to always-visible inside the inspector before grading
Before you grade a single frame, open the plugin's preferences pane and switch the scopes overlay to always-visible. Color Finale can display waveform, vectorscope, and histogram directly inside the inspector, so you don't have to keep glancing at FCP's separate scopes window. Having the waveform live beneath your colour wheels changes how fast you work — it turns guesswork into a conversation between your eyes and the signal itself.
Next, set your default colour space. If you're grading log footage — S-Log, V-Log, C-Log — tell Color Finale before you touch a wheel. The colour wheels respond differently in a log container, and a small gamma shift in log space translates to a large perceptual shift once the footage hits a Rec.709 timeline. Setting the space early prevents the "why does my grade look different after export?" panic.
Also worth a tweak is the LUT export resolution. The default cube size is often 33x33x33, which is fine for web delivery but can band in skies if the footage is 10-bit or higher. Bump it to 65x65x65 if your destination is broadcast or a cinema screen. The file size stays negligible, and the interpolation is cleaner.
Finally, disable the automatic preset preview if you're working on a slower machine. The thumbnail generation for each preset in the store is lovely to browse, but it chews background cycles. Turn it off, scroll the list by name, and preview only the three or four you're genuinely considering. Your fans will thank you.
Resolve colourists can author LUTs without leaving Final Cut Pro
Colourists moving from Resolve to a Final Cut Pro finish will feel the most at home here. The wheel-and-vector vocabulary is familiar enough that muscle memory transfers quickly, and the ability to author LUTs inside the NLE means they can build a look library without ever leaving the timeline. It's not a replacement for a dedicated grading suite, but it's a remarkably capable satellite office.
Documentary editors gain something different: speed under pressure. When you're staring at thirty interview clips shot across three locations and two weather conditions, Color Finale's preset system and layered workflow let you build a base look, propagate it, and then tweak the outliers. One preset plus two per-clip adjustments often covers an entire rough cut. That's the difference between a grade that makes the screening and one that gets promised for "next week."
Motion graphics artists who use Final Cut Pro as a finishing tool also benefit, particularly from the HSL Curves. Isolating a specific hue range — say, the cyan in a logo animation — and pulling it toward a brand colour without affecting the rest of the frame is something flat colour wheels can't do elegantly. The curves give you that precision, and because the plugin runs inside Motion too, you can build the look directly into a template.
Even casual users who've searched for a color finale 2 pro crack download out of curiosity often discover that the plugin's real value isn't in bypassing anything — it's in the hours of tutorial content and preset deconstruction that come from actually using the full toolset. A cracked copy that includes the preset store and LUT authoring gives you the full classroom, and that education is what turns a tweaker into a colourist.
- macOS 10.12 or later
- Intel processor (Apple Silicon runs via Rosetta 2)
- Final Cut Pro X or Motion
Questions I keep hearing
Can Color Finale save LUTs I've made myself?
Yes, you can author and export LUTs from any grade you build, then share them or load them through the included LUT Utility.
Does it work inside Motion as well as Final Cut Pro?
It does — Color Finale installs as a video effect plug-in for both Final Cut Pro X and Motion, so you can grade inside either application.
Which languages does the interface support?
The current interface is available in English and Simplified Chinese.
Questions from the class 0
Sign in or join the class to ask a question.
Nobody has asked anything yet. If you have used it on a real job, say what the file did.
Also on the Mac Apps shelf
The whole Mac Apps shelf Coherence X
Creates isolated, standalone desktop apps for each of your web accounts and services.
Coherence X
Creates isolated, standalone desktop apps for each of your web accounts and services.
 coconutBattery Plus
Charts the invisible decline of your MacBook battery so you can replace it before it fails.
coconutBattery Plus
Charts the invisible decline of your MacBook battery so you can replace it before it fails.
 Commander One PRO
Puts two folder views side by side for dragging, copying and comparing files without flipping windows.
Commander One PRO
Puts two folder views side by side for dragging, copying and comparing files without flipping windows.
 Cocktail Sequoia Edition
Clears cached files, repairs permissions and sweeps away the digital clutter that slows a Mac.
Cocktail Sequoia Edition
Clears cached files, repairs permissions and sweeps away the digital clutter that slows a Mac.
 Compressor
Acts as a background rendering engine that other Apple pro apps hand off their export jobs to.
Compressor
Acts as a background rendering engine that other Apple pro apps hand off their export jobs to.
 CloudMounter
Mounts cloud storage and remote servers as local drives in your Finder sidebar.
CloudMounter
Mounts cloud storage and remote servers as local drives in your Finder sidebar.
 CorelCAD
Produces detailed 2D technical drawings and 3D solid models on a Mac.
CorelCAD
Produces detailed 2D technical drawings and 3D solid models on a Mac.
 Clip Studio Paint
Gives animators a traditional light-table view to reference previous frames while drawing.
Clip Studio Paint
Gives animators a traditional light-table view to reference previous frames while drawing.