 ASPNetWorld
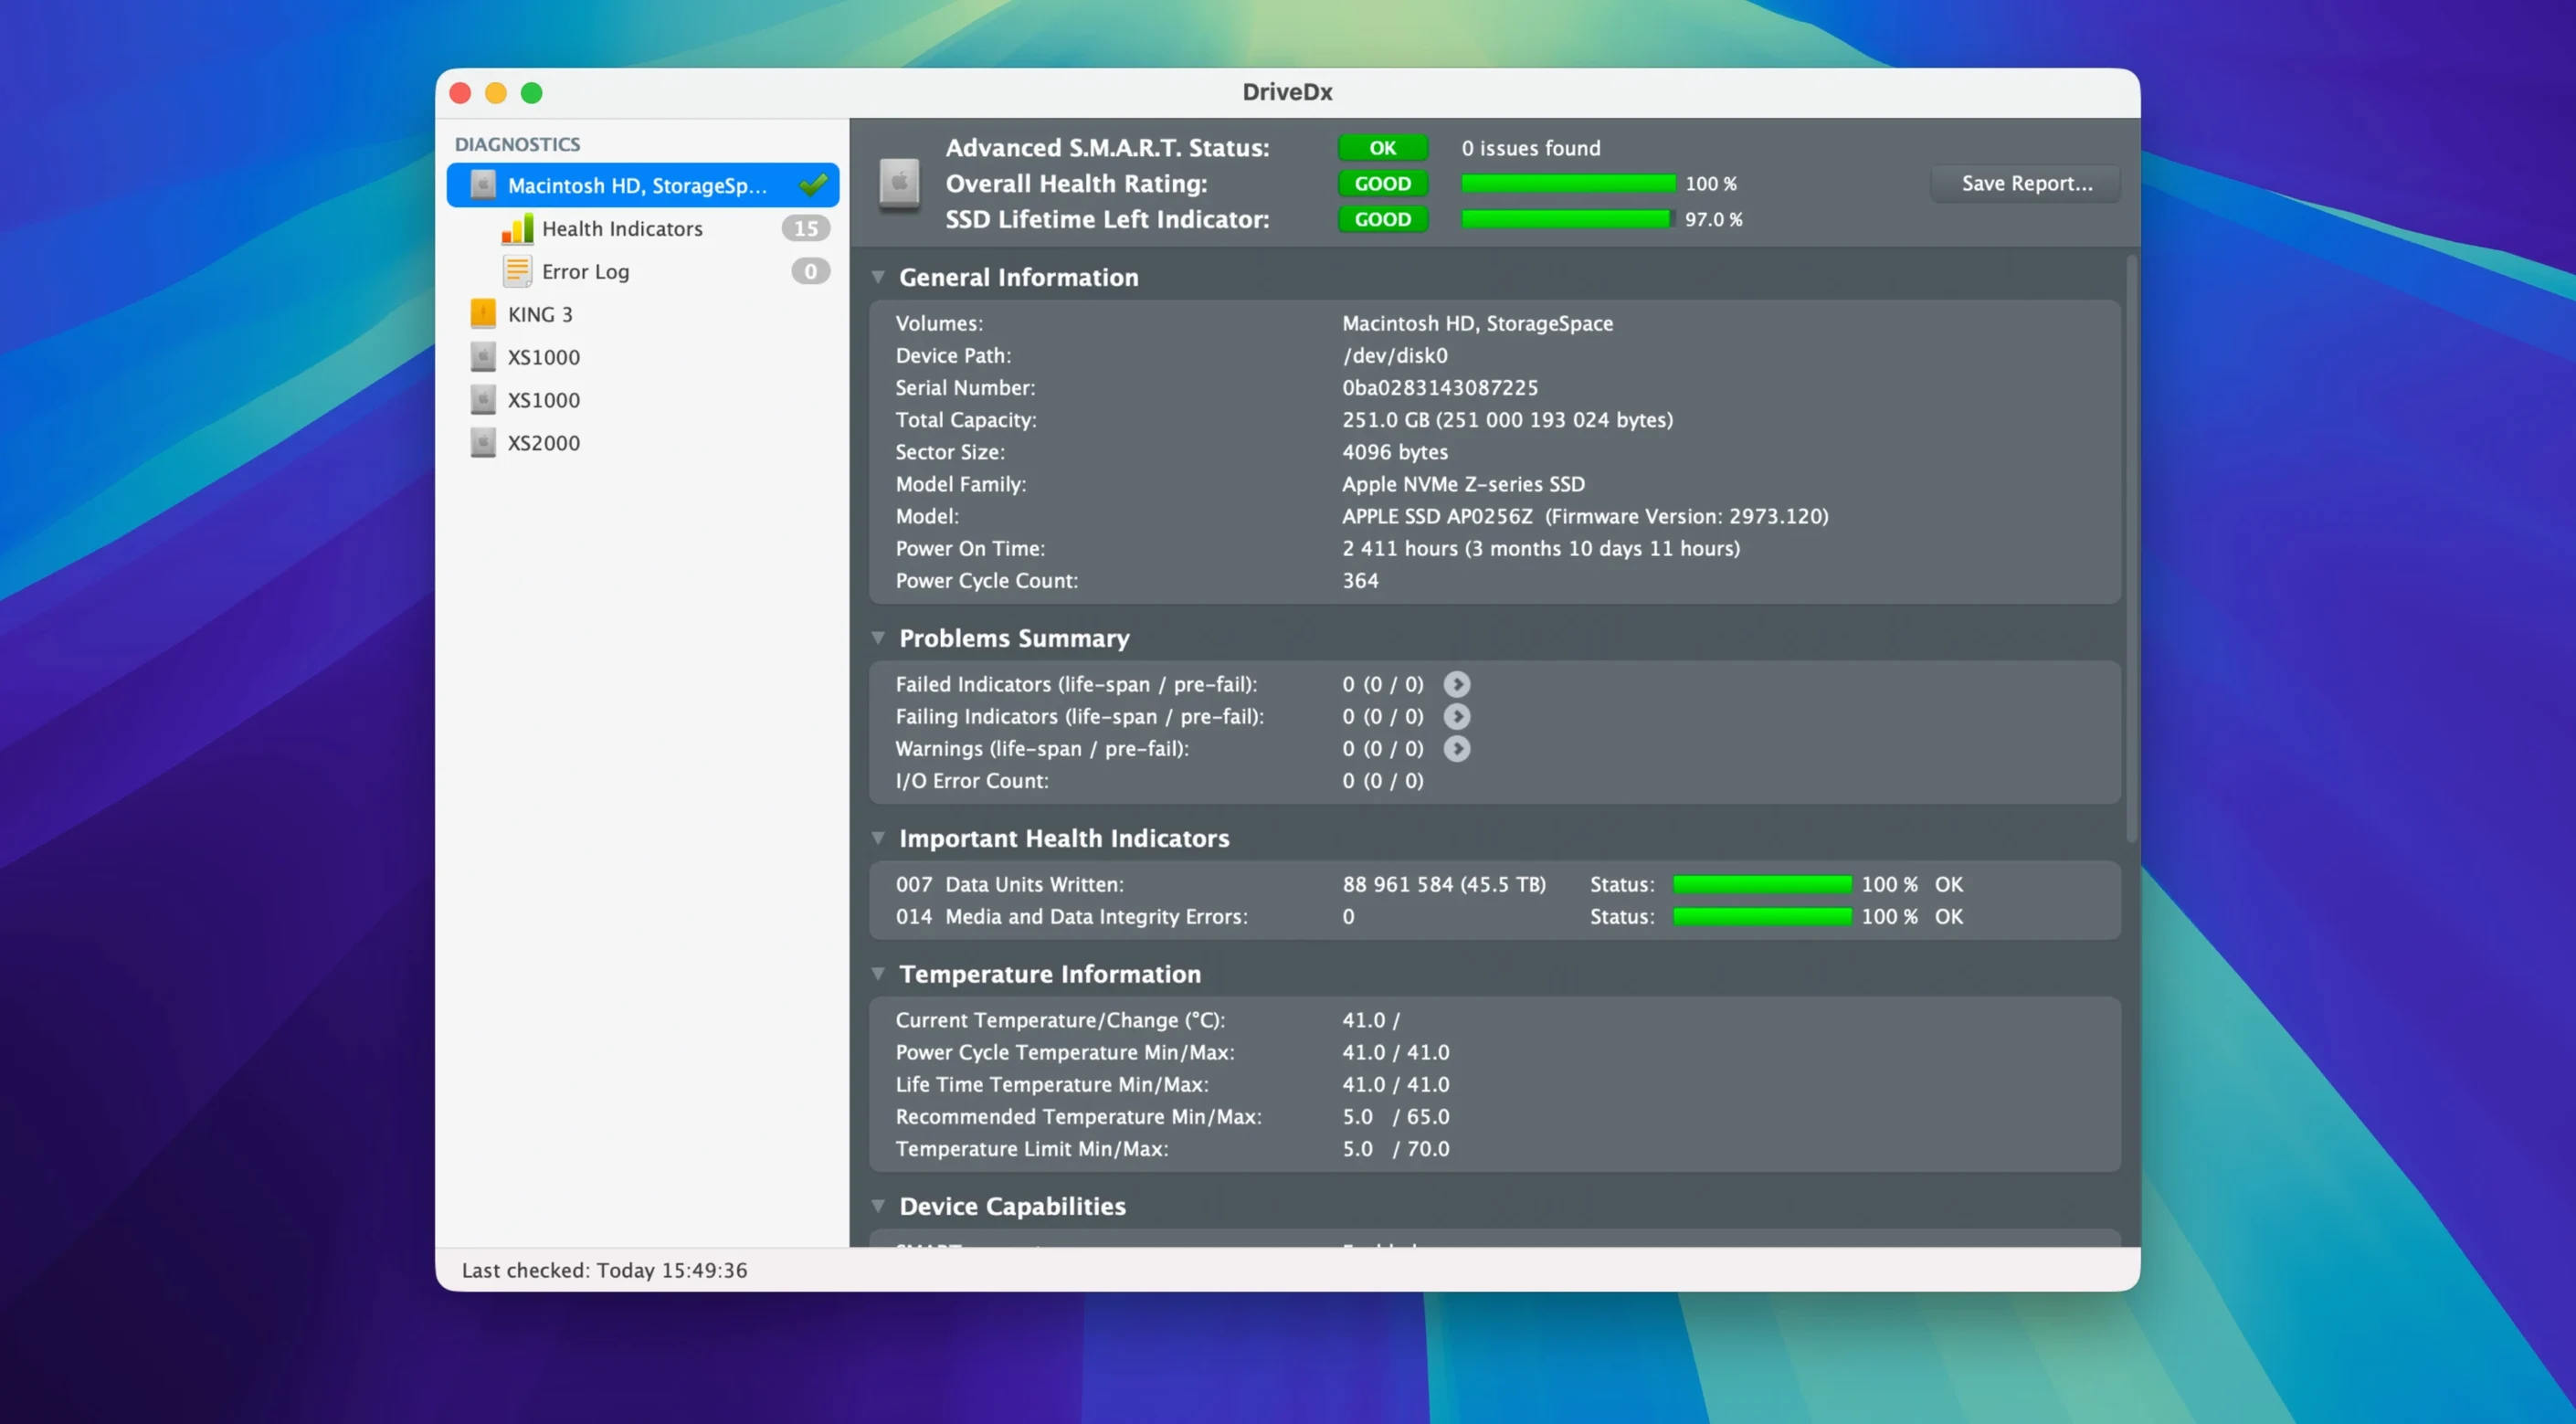
Most Mac utilities only tell you a drive is fine or dead, but DriveDx adds two more states: warning and failing. That gap between "OK" and "failed" is where data gets rescued in time, and it is the whole reason this third-party tool exists.
Who needs a drive diagnostic utility?
Anyone who would rather replace a drive on their schedule than discover it has died during a deadline. Unlike the basic S.M.A.R.T. check buried in System Information, DriveDx reads a wider set of internal drive indicators and turns them into a health score you can actually act on.
What does DriveDx do that System Information does not?
It interprets raw S.M.A.R.T. attributes into plain English, grading each indicator so you see which component is wearing out. You also get short and full self-tests you can trigger manually, plus the option to let the app sit in the background polling drive status at regular intervals.
Runs natively on SSDs, with tweaked heuristics for Patriot P200 drives
Absolutely. The current version, 1.12.1, includes improved diagnostic heuristics and specifically better support for Patriot P200 SSDs. It handles both traditional spinning disks and modern solid-state drives without treating them as the same kind of device.
Flip the notification switches in Preferences to make DriveDx proactive
Out of the box, DriveDx is already keeping an eye on your drives, but a few switches in Preferences make it far more useful for everyday life. Open the app and head straight to the Notifications tab — this is where the real safety net lives.
The first thing I change is the health change threshold. Version 1.12.1 updated these notification triggers to be less jumpy, but the default still only fires when a drive moves from OK to Failing. I prefer to know the moment a drive dips into the Warning state. Tick the box for Notify when drive health changes to Warning and you buy yourself weeks or months of lead time instead of a panic on a Tuesday evening.
Next, decide whether you want the background monitoring to launch at login. It is not on by default, but I recommend turning it on. The app sits quietly in the menu bar, consuming almost no resources, and it checks drive status at the interval you set. I find every hour strikes the right balance between staying informed and never noticing it is running.
While you are in Preferences, glance at the Drive Self-Test section. The short test takes a couple of minutes and is safe to run while you work. The full test can take hours and will slow the drive noticeably, so I suggest enabling the option that warns you before a full test begins — it has saved me from accidentally grinding a Time Machine backup to a crawl more than once.
Straightforward fixes for macOS permission friction points
Most drive diagnostic utilities for macOS run into the same handful of friction points, and DriveDx is no exception. The good news is that nearly all of them have straightforward fixes.
The driver installer prompt appears every launch
This is the number one complaint I hear from people who have just downloaded DriveDx for Mac. The app needs a low-level system extension to read the full set of S.M.A.R.T. attributes, and macOS is understandably cautious about granting that access. What trips people up is clicking "Allow" in the Security & Privacy pane but not actually running the installer the app presents. The sequence matters: after approving the extension in System Settings, quit DriveDx completely, reopen it, and then work through the installer dialogue that appears. With version 1.12.1, that installer no longer needs Rosetta 2 on Apple Silicon Macs, so the process is a single clean step rather than a two-part translation dance.
External drives show no health data
Not every USB enclosure passes S.M.A.R.T. commands through to the drive inside. If you plug in an external disk and DriveDx shows a blank dashboard, the problem is almost certainly the enclosure's bridge chip, not the app. A quick test: connect the same drive using a different enclosure or a direct SATA-to-USB cable. If the data appears, you know the first enclosure is the culprit. Thunderbolt enclosures tend to be more reliable for this than cheap USB 3.0 caddies.
A drive shows "Warning" but everything feels fine
This is exactly the scenario DriveDx was built for, and it is the moment when you should pay closest attention rather than dismissing the alert. A Warning state usually means one or two S.M.A.R.T. attributes have drifted outside their normal range — something like a handful of reallocated sectors or a modest increase in SSD wear levelling count. The drive is not failing yet, but it is telling you something. Run a short self-test from within the app to confirm the reading, then check the same drive weekly for a month. If the number is creeping upward, plan a replacement. If it is stable, you can relax.
DriveDx macOS notifications stop appearing
After a macOS update, notification permissions sometimes get reset silently. If you notice the menu bar icon but no alerts, open System Settings, find Notifications, and scroll down to DriveDx. Make sure the alert style is set to Banners or Alerts, not None. While you are there, check that Focus modes are not suppressing the app.
The driver installer now skips Rosetta 2 on Apple Silicon Macs
Version 1.12.1 is a maintenance release, but that label undersells a few practical improvements. The most noticeable change for Apple Silicon users is that the driver installer no longer depends on Rosetta 2. That means one less translation layer between the app and your drive hardware, and a noticeably smoother first-launch experience if you are on an M1, M2 or M3 Mac.
The diagnostic algorithms and heuristics received a quiet but meaningful polish. In practice, this translates to fewer false-positive Warning states on SSDs that use aggressive power management — drives that previously looked like they were developing bad sectors were actually just parking their heads or entering deep sleep states mid-poll. The refined heuristics in 1.12.1 distinguish between genuine wear and normal power-saving behaviour far more reliably.
Support for Patriot P200 SSDs was specifically improved, which matters if you have upgraded a Mac with one of these budget-friendly drives. Earlier versions misread certain wear indicators on the P200 controller, occasionally showing a healthy drive as Failing. That is now corrected.
The health change notification thresholds were also updated. Previously, a single attribute blip could trigger an alert, which made sense for spinning hard drives where a sudden reallocation spike often signals imminent mechanical failure. For SSDs, the thresholds are now more graduated, reflecting the reality that flash storage degrades gradually rather than catastrophically. You still get warned, but you get warned at the right moment rather than the first wobble.
A workflow: investigating a sluggish external drive
Let me walk through a real scenario. A student brings in a portable USB hard drive used for video projects. The drive still mounts, but transfers have slowed to a crawl and the Mac occasionally beachballs when the drive is connected.
Step one is to open DriveDx and locate the external drive in the sidebar. The health indicator sits at Warning (63%) — not terrible, but not reassuring. I ignore the percentage for a moment and scroll to the attribute list.
Two lines jump out immediately. Reallocated Sector Count shows a raw value of 142, and the status is marked in orange. Current Pending Sector Count sits at 8. Together, these paint a clear picture: the drive has already found and remapped 142 bad sectors, and it has 8 more that it cannot read well enough to decide whether to remap. Every time the Mac tries to access one of those pending sectors, the drive retries several times before giving up — that is the beachball.
Step two is to confirm the reading. I run a short self-test (the button is right there in the drive detail pane). Two minutes later, the test completes with errors on the same logical blocks. The diagnosis is consistent.
Step three is practical. The drive is not dead, but it is not trustworthy. I copy everything off it immediately, starting with the most irreplaceable folders. Because the pending sectors are in a specific area of the disk, some files copy at full speed while others stall for twenty seconds. That pattern alone is classic pre-failure behaviour.
Step four is what I do not do: I do not run a full self-test, I do not attempt a filesystem repair, and I do not keep using the drive. The full test would stress an already struggling mechanism. Disk Utility's First Aid would hammer the same pending sectors repeatedly. The drive has told me it is on the way out, and DriveDx gave me the translation I needed to act on that information.
How DriveDx compares with similar Mac utilities
The Mac drive diagnostic space is not crowded, but a few alternatives come up whenever someone searches for a DriveDx macOS equivalent. Each takes a different approach to the same underlying S.M.A.R.T. data.
DriveDx versus Smart Utility
Smart Utility by Volitans Software covers similar ground, reading S.M.A.R.T. attributes and presenting them in a clean single-window interface. Where DriveDx pulls ahead is in its heuristic interpretation — the algorithms that turn raw hexadecimal counters into a health rating you can understand without a reference chart. Smart Utility gives you the numbers; DriveDx gives you a verdict. For people who enjoy reading S.M.A.R.T. specification documents, the difference is academic. For everyone else, DriveDx saves a lot of guesswork. DriveDx also handles SSD-specific indicators like wear levelling count and lifetime writes with more nuance, particularly after the 1.12.1 heuristics update.
DriveDx versus diskutil and smartmontools
The built-in diskutil command and the open-source smartmontools package are the free, terminal-based alternatives. They are powerful and scriptable, and I use them on servers where a graphical app makes no sense. But on a daily-use Mac, opening Terminal and remembering the correct flags for smartctl -a disk0 is friction most people do not need. DriveDx wraps that same data in a dashboard that updates automatically, sends notifications, and draws trend graphs without a single command line. If you manage a fleet of Macs, smartmontools and some scripting might be the better fit. For a single Mac you care about, DriveDx is the tool you actually open.
DriveDx versus Disk Drill's S.M.A.R.T. module
Disk Drill, which many people find when they download DriveDx for Mac as part of a broader data recovery search, includes a basic S.M.A.R.T. viewer in its toolset. It shows the current status and a handful of attributes, but it does not run self-tests, does not track health history over time, and does not offer Warning or Failing states with the same granularity. Disk Drill's strength is file recovery after a problem has happened; DriveDx's strength is noticing the problem before files disappear. They complement each other well, but they are not really competitors — one is a paramedic, the other is a check-up.
Version 1.12.1 is a maintenance release that tidies up a few important corners. The driver installer no longer needs Rosetta 2, the diagnostic algorithms were refined, and the app is confirmed ready for macOS Sonoma.
- Driver installer drops the Rosetta 2 dependency
- Improved drive diagnostic algorithms and heuristics
- Better support for Patriot P200 SSDs
- macOS 10.9 (Mavericks) or later, including macOS Sonoma
- Apple Silicon or Intel Mac
- Interface language: English
Questions from the class 0
Sign in or join the class to ask a question.
Nobody has asked anything yet. If you have used it on a real job, say what the file did.
Also on the Mac Apps shelf
The whole Mac Apps shelf Dropover
Holds dragged files on a floating shelf so you can gather items before dropping them elsewhere.
Dropover
Holds dragged files on a floating shelf so you can gather items before dropping them elsewhere.
 Duplicate File Finder Pro
Scans folders for duplicate files and helps you merge similar folders into one tidy library.
Duplicate File Finder Pro
Scans folders for duplicate files and helps you merge similar folders into one tidy library.
 DVDFab
Copies a DVD-9 film onto two standard DVD-5 discs while keeping the original menus.
DVDFab
Copies a DVD-9 film onto two standard DVD-5 discs while keeping the original menus.
 DxO PhotoLab
Processes raw photos with lens-specific corrections and local adjustment masks.
DxO PhotoLab
Processes raw photos with lens-specific corrections and local adjustment masks.
 DockView
Shows a live preview of any app’s open windows when you hover over its Dock icon.
DockView
Shows a live preview of any app’s open windows when you hover over its Dock icon.
 DxO ViewPoint
Corrects distorted perspective and volume deformation in wide-angle architectural shots.
DxO ViewPoint
Corrects distorted perspective and volume deformation in wide-angle architectural shots.
 DMG Canvas
Builds polished disk-image installers with a custom background and licence window.
DMG Canvas
Builds polished disk-image installers with a custom background and licence window.
 DynamicLake Pro
Puts a slim pill-shaped panel near your Mac’s notch for music, calendar, and system toggles.
DynamicLake Pro
Puts a slim pill-shaped panel near your Mac’s notch for music, calendar, and system toggles.