 ASPNetWorld

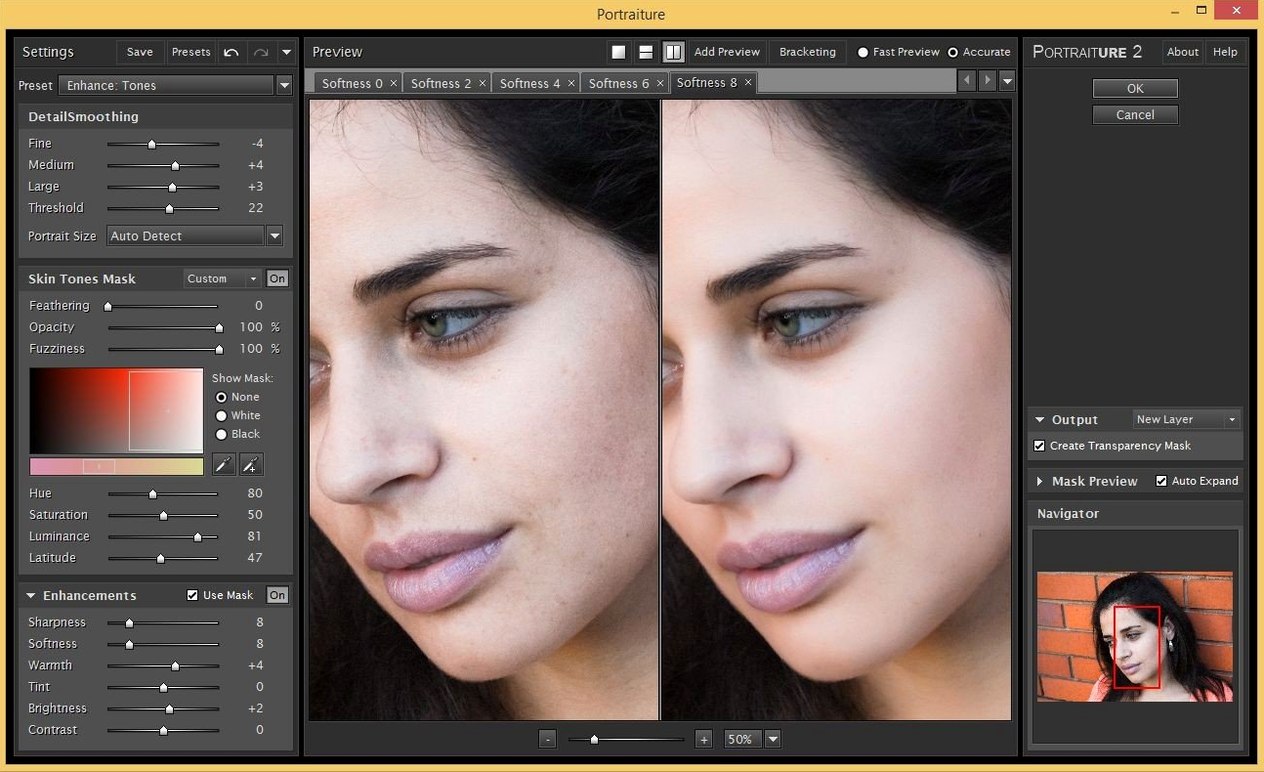
Wedding and portrait photographers who spend hours retouching skin know the value of a tool that feels invisible. The Imagenomic Professional Plugin Suite bundles Portraiture, Noiseware, and Realgrain into a single set that lives inside Photoshop, Lightroom Classic, and Affinity. It is not a standalone editor; it slots into the host application's filter menu and works on a duplicate layer or a Smart Object, so every adjustment stays non-destructive.
Noiseware handles the clean-up work early in a session. It analyses luminance and colour noise separately, which helps when a reception shot at ISO 6400 needs smoothing without turning the bridal gown into soft plastic. You can run it on a bus group or a batch of images from the same lighting setup, keeping the look consistent across a gallery.
Portraiture does the heavy lifting on skin, masking tones automatically rather than relying on a hand-painted selection. For an environmental portrait, you might apply it lightly to the subject's face while leaving the textured jacket and brick wall behind them untouched. Realgrain enters later, when a colour image is converted to black and white and needs the bite of Tri-X grain or a split-tone that mimics a selenium print. A little grain in the shadows can rescue a flat digital file and give it the weight of a darkroom contact sheet.
A typical session with the Imagenomic Professional Plugin Suite starts, as these things often do, after the shoot itself is over and the card has been ingested into Lightroom Classic. Let's say the job is a set of headshots taken in a loft with mixed daylight and a single softbox. The raw files are clean but a little sterile — sharp enough to show every pore and stray thread, which is exactly what you need to address before the client sees the proofs.
The first step is always Noiseware, even at low ISOs. Modern sensors hide a fine texture of luminance noise in the mid-tones that becomes obvious once you start lifting shadows. You select the first keeper, open it in Photoshop as a Smart Object, and launch Noiseware from the Filter menu. The preview window gives you a split-screen view, and you dial the luminance reduction back to about 40 percent. Colour noise is set to zero because there is none to speak of, but you check the shadows on the dark jumper the subject is wearing just to be sure. Once the setting feels right, you save it as a preset — Loft Headshots NR — and apply it to the rest of the set in one Lightroom sync. That is five minutes saved straight away.
Portraiture comes next, on a per-image basis. You open the first close-up and duplicate the background layer. The plugin's auto-masking does something clever: it reads the skin tones across the face and builds a soft matte around the cheeks, forehead and neck while leaving the eyes, lips and hairline sharp. You are not painting a mask by hand. A gentle smoothing pass at about 25 percent strength evens out the texture without losing the fine downy hairs near the temple. For the male headshots in the same set, you drop the smoothing further and let the skin texture show through more aggressively — the preset called Male - Light is a good starting point, then you nudge the threshold slider until the jawline still reads as skin but the stubble stays crisp. That is the difference between a retouch that looks like a retouch and one that nobody notices.
Realgrain is the final pass, and it is where the mood locks in. You have a colour portrait that feels a little too clean, a bit too much like a frame grab from a video camera. You add a Black & White adjustment layer above the retouched pixels, then call Realgrain. The plugin lets you pick a film stock profile — Tri-X 400 is the default, but you scroll through until you land on Ilford HP5 Plus, which has a slightly softer grain structure and a longer tonal tail in the highlights. You set the grain size to match the output resolution (a 24-megapixel file printed at A3 needs a smaller grain than a web export, so you dial it back to about 70 percent) and add a subtle warm tone in the split-tone panel, just a whisper of sepia in the mid-tones. The image now looks like it was scanned from a negative rather than pulled off a sensor. The grain dances in the out-of-focus background, giving the whole frame a tactile quality that flat digital files rarely have on their own.
Batch-editing hundreds of wedding photos with a global skin pass
Wedding photographers who deliver hundreds of images per job are the obvious audience. Portraiture's batch-processing capability inside Lightroom means you can apply a global skin pass to an entire ceremony sequence, then spend your editing time on the ten hero shots that actually go into the album. It is not about replacing skill — it is about removing the repetitive part of the work so you can focus on the creative decisions.
Fine-art portraitists get a different kind of value from the same plugins. They tend to work one image at a time, often in Photoshop, building up layer after layer of subtle adjustments. Realgrain becomes a signature tool in this workflow because it gives black-and-white conversions a consistency that is hard to achieve with the built-in Adobe grain engine. When every print in a series needs to feel like it came from the same darkroom session, having recallable grain and toning presets keeps the collection coherent.
Restoration specialists and archive workers lean heavily on Noiseware. Old scans of family prints, daguerreotypes digitised with a macro lens, or high-ISO scans of negatives that were never meant to be enlarged — these all carry noise patterns that are not the clean, random noise of a digital sensor. Noiseware's frequency-based analysis handles the blotchy, irregular grain of pushed film better than most general-purpose noise reducers. You can tame the noise in a 35mm Tri-X scan pushed two stops without turning the grain into mush, which matters when the image is destined for a book or a gallery wall.
Even documentary and travel photographers who never thought they needed skin smoothing find themselves dipping into Portraiture occasionally. A street portrait shot in harsh sunlight, where the subject's skin looks red and patchy, can be rescued with a 10 percent pass — just enough to calm the colour transitions without losing the character of the face. It is the same tool, used at a fraction of its power, and it saves a shot that might otherwise be discarded.
Quiet Apple Silicon refinement tightens native integration
The 2027 release of the Imagenomic suite is largely about compatibility and quiet refinement rather than headline features. Apple Silicon support arrived earlier, but this version tightens the integration so that all three plugins run natively on M-series chips without Rosetta translation. In everyday use, that means the filter previews render faster — Portraiture's mask calculation on a 45-megapixel file completes in roughly half the time it used to, which adds up over a long editing session.
The interface across Portraiture, Noiseware and Realgrain has been nudged to work properly on high-resolution Retina displays, so the sliders no longer look soft at 2x scaling. A small but welcome change is that the preset manager now remembers your last-used folder across sessions, so you are not navigating back to your custom presets every time you launch a plugin. For Lightroom Classic users, the external editing hand-off feels snappier, with fewer beachball moments when sending a raw file out to Photoshop for plugin work and returning the rendered TIFF.
Under the hood, the plugin suite has been updated to support macOS 15 and the latest Photoshop and Lightroom Classic releases, which is the kind of change you only notice when it is missing and suddenly nothing works. The fact that it also still runs on macOS 13 means studios that are slow to update their machines are not left behind.
Working inside your host editor’s non-destructive workflow
The Imagenomic suite does not try to be a standalone application, and that is its strength. It lives inside the host editor, which means it inherits whatever non-destructive workflow you have already built. In Photoshop, that means Smart Objects and layer masks. You apply Noiseware to a Smart Object and paint the mask with a soft brush to bring back detail in the eyes or the texture of a garment. In Lightroom Classic, the round-trip to Photoshop is handled automatically: you right-click, choose Edit In, run Portraiture on a duplicate layer, save, and the retouched file appears alongside the original raw.
For photographers using Affinity Photo, the suite plugs into the Filters menu in the Photo Persona. The workflow feels familiar — the same three plugins, the same preset system — and because Affinity handles external plugins cleanly, there is no awkward file juggling. The fact that the imagenomic professional plugin suite works across three different host applications means you are not locked into one editing platform. You can cut your raw files in Lightroom, switch to Affinity for compositing, and still call Realgrain from either environment.
The plugins also play nicely with macOS colour management. They read the display profile set in System Settings and render previews accordingly, which matters when you are judging grain size or noise reduction on a calibrated external monitor. Spotlight does not index the plugins themselves, but your exported presets can be saved to iCloud Drive and shared across machines if you run the imagenomic for mac setup on a desktop and a laptop. A preset you create on a Mac Studio in the studio shows up on a MacBook Pro when you are editing in a café, as long as you point the preset browser to the same cloud folder.
There is a quiet synergy with the imagenomic professional plugin suite for adobe photoshop that extends beyond the obvious. Because all three plugins share a common interface language and preset architecture, learning one effectively teaches you the others. The masking logic in Portraiture, the frequency analysis in Noiseware and the grain pattern engine in Realgrain all lean on the same underlying image-analysis principles. Once you understand how the threshold slider behaves in one plugin, you can predict its behaviour in the next. That might sound like a small thing, but on a deadline it means you spend less time interpreting the tool and more time looking at the photograph.
- macOS 13 or later
- Apple Silicon or Intel 64-bit processor
- Host application: Adobe Photoshop, Lightroom Classic, or Affinity
- Interface language: English
Questions I keep hearing
Does the Imagenomic Photo Suite run natively on Apple Silicon?
Yes, the suite supports both ARM and x86 64-bit systems on macOS 13 and later.
Which host applications does the suite work with?
Imagenomic lists Photoshop, Lightroom Classic, and Affinity as compatible hosts on the Mac.
Questions from the class 0
Sign in or join the class to ask a question.
Nobody has asked anything yet. If you have used it on a real job, say what the file did.
Also on the Mac Apps shelf
The whole Mac Apps shelf iExplorer
Transfers music, messages and files between an iPhone and a Mac without using iTunes or iCloud.
iExplorer
Transfers music, messages and files between an iPhone and a Mac without using iTunes or iCloud.
 Imagenomic Portraiture
Smooths skin and removes blemishes across a whole shoot while preserving natural texture.
Imagenomic Portraiture
Smooths skin and removes blemishes across a whole shoot while preserving natural texture.
 iMazing
Creates local, browsable backups of an iPhone or iPad and extracts specific files from them.
iMazing
Creates local, browsable backups of an iPhone or iPad and extracts specific files from them.
 Infuse Pro
Plays almost any video file, including high-bitrate MKVs, direct to your screen or receiver.
Infuse Pro
Plays almost any video file, including high-bitrate MKVs, direct to your screen or receiver.
 Hyperspace
Hunts down and deletes duplicate files that are quietly wasting your disk space.
Hyperspace
Hunts down and deletes duplicate files that are quietly wasting your disk space.
 Hype 4 Pro
Constructs interactive HTML5 animations without writing a single line of code.
Hype 4 Pro
Constructs interactive HTML5 animations without writing a single line of code.
 iShot Pro-ScreenShot Recording
Captures screenshots, scrolling pages and screen recordings with a floating toolbar.
iShot Pro-ScreenShot Recording
Captures screenshots, scrolling pages and screen recordings with a floating toolbar.
 iStat Menus
Puts CPU, memory, disk, network and weather stats right in your menu bar.
iStat Menus
Puts CPU, memory, disk, network and weather stats right in your menu bar.