 ASPNetWorld
You've just finished a round of colour grading on a headshot session, and the light is beautiful, but now you're staring at a hundred frames that all need the same delicate skin work. That's the moment a plugin earns its place. Imagenomic Portraiture sits on your retouching bus, right after your global adjustments, ready to handle the smoothing before you move on to local dodging and burning.
I place it on a duplicate layer right after raw processing
I tend to place it on a duplicate layer immediately after my raw processing. It's a dedicated smoothing step that happens before I refine details like eyes and hair, so I'm not trying to balance skin texture while I'm sharpening.
It builds an automatic skin mask so you skip manual painting
You don't paint a mask. The plugin analyses the image and builds an automatic skin mask, so it's smoothing only the areas it identifies as skin tone. That removes a huge chunk of selective masking work from your session.
It replaces the tedious Healing Brush and frequency separation grind
It's designed to cut down the pixel-by-pixel retouching work—the kind where you'd normally spend ages with the Healing Brush or a frequency separation setup just to even out a complexion. It lets you start from a much cleaner base.
The default preset is deliberately heavy-handed as a showcase
Out of the box, Portraiture lands with a default preset that's honestly a bit heavy-handed. It's meant to show you what the engine can do, not what you should leave it at. The first thing I tell my evening class students is to pull the Strength slider down to about 40% and work upwards. That one change alone stops the plastic-skin look before it starts.
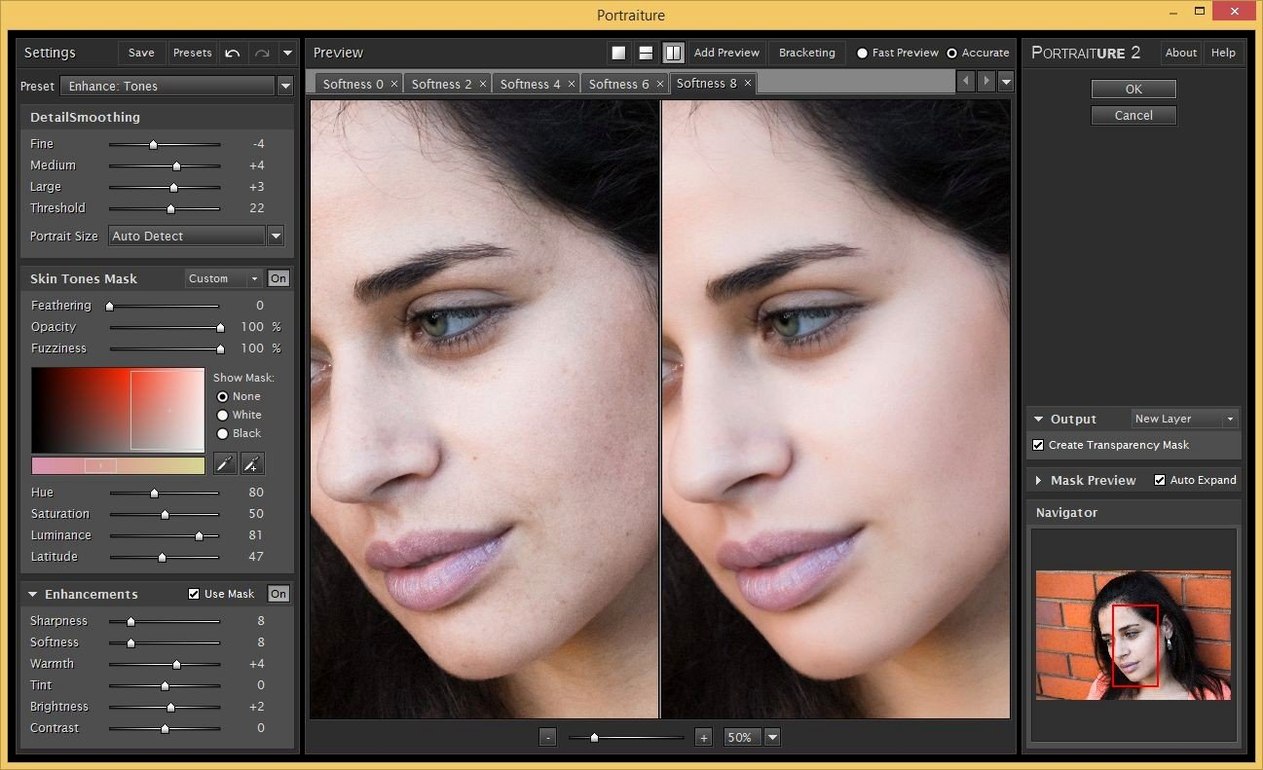
Next, head to the Output panel, which hides in plain sight at the bottom. The default is "Same as input," meaning the plugin flattens its work straight onto your current layer. Switch it to New Layer instead. That gives you the smoothed result on a separate layer with a mask, so you can brush it back in selectively, lower opacity, or blend it—none of which you can do if you've baked it in. It's the single most useful setting that nobody talks about.
While you're there, tick Create Mask. The automatic skin mask the plugin builds internally is excellent, but having it available as a layer mask in Photoshop means you can refine it with a soft brush if the auto-detection missed a patch of forehead or caught an ear a little too enthusiastically.
Finally, open the Presets menu and delete the idea that you need to make your own from scratch. Start with "Smoothing: Normal" as a baseline, then tweak. It's a well-balanced starting point that respects texture far more than the default.
Easy-to-miss shortcuts and small conveniences
The zoom controls in Portraiture are not obvious, and I've watched experienced retouchers reach for the Navigator panel instead. Hold the Space bar and click to zoom in; hold Option and the space bar to zoom out. Click and drag to pan. It's the same convention as Photoshop's own zoom tool, but people assume a plugin won't behave that way. It does.
The preview window has a split-screen toggle, and it's easy to miss because the icon is small—a vertical line with arrows on either side. Tap P on your keyboard to turn the before-and-after split on and off. When you're fine-tuning the fine detail threshold, that split view is worth its weight in gold.
Above the main preview, there's a tiny mask view button (it looks like a checkerboard). Click it once and the preview shows you the skin mask as a white-on-black overlay. White areas are what Portraiture intends to smooth. If you spot white bleeding into hair or clothing, go straight to the Skin Mask controls and nudge the Hue, Saturation, or Luminance sliders to tighten the selection. Most people never open this view, and then they wonder why a collar got softened.
Another hidden gem: the Alt-click reset. Alt-click any slider handle to snap it back to its default value. It works across every panel in the plugin, and it's a lifesaver when you've wandered off into experimental territory and just want to start a particular parameter fresh without resetting the whole preset.
For Lightroom Classic users, the plugin can be assigned a keyboard shortcut via Lightroom's own shortcut manager. Map it to something you'll remember, and you can jump into Portraiture on a selected image without touching a menu. On a tethered shoot where you're showing proofs, that speed matters.
A start-to-finish task: retouching a single environmental portrait
Let's say you've got a portrait shot by a window, soft daylight, and the sitter has a complexion that's basically good but uneven in tone—some redness across the cheeks, a little texture on the forehead, nothing drastic. You want to even things out without losing the character of the skin. Here's how that plays out in Portraiture.
In Photoshop, duplicate your background layer and open Portraiture from the Filter menu. The plugin loads with the default preset, and immediately the preview looks waxy. Ignore that. Set Strength to 35%. Switch the output to New Layer and tick Create Mask. Now go to the Skin Mask panel and click the checkerboard icon to examine the auto-mask. The mask should be covering the face, neck, and a bit of the hands if they're in frame. If the sitter is wearing something skin-toned—say, a beige scarf—you might see some white there too.
Tighten the mask. In the Skin Mask panel, lower the Luminance range slightly on the dark end to drop the scarf out of the selection. Raise the Hue specificity a notch so the mask concentrates more precisely on skin tones. Flick the mask view off and you'll see the smoothing is now confined to the right areas.
Now adjust the smoothing itself. The Fine slider controls small texture—pores, light stubble, the very fine stuff. Leave it around 50% for this portrait because you want that texture present. The Medium slider handles broader unevenness, and that's where the redness lives; push it to 60%. The Large slider affects overall tonal transitions, and for this soft-lit image you can leave it at its default or even drop it a touch to avoid flattening the gentle shadow fall-off across the sitter's cheek.
The Portrait Enhancer section, often overlooked, gives you three subtle controls. Add a tiny amount of Warmth if the skin feels cold from the window light—just 5 or 6 points. Leave Tint alone unless you're correcting a colour cast. A small Brightness bump, around 4, lifts the skin slightly without affecting the background. Click OK.
Back in Photoshop, you've got a new layer with a mask. Zoom in. The smoothing is there, but the pores are still visible—exactly what you wanted. If the eyes got caught in the mask (they sometimes do), grab a black brush at 50% opacity and paint over them on the mask. Lower the layer opacity to 85% for a more natural blend. You've just done five minutes of work that would have taken twenty with manual methods, and the skin still looks like skin.
Running it directly on the background layer locks in the effect permanently
The most common one I see in class is running the plugin on the background layer itself, with output set to "Same as input." That's a one-way street. You can't undo it after you close the filter, and you've lost your original pixels. Always work on a duplicate, or use the New Layer output. It's not a beginner tip—it's a safety net for everyone.
Another mistake is treating Portraiture as a one-click fix and never opening the Skin Mask controls. The automatic mask is smart, but it's not psychic. On darker skin tones, it can occasionally misjudge the luminance range and miss patches entirely, or it can pick up background elements that happen to share a skin-like hue. If you never check the mask view, you'll never know.
Over-smoothing the Fine detail is a classic error. Beginners often crank it to 80% or more, chasing a flawless look, and end up with a face that looks like it's been rendered in porcelain. The Fine slider should almost never go above 60% unless you're working on a beauty campaign that specifically calls for that aesthetic. Pores are not the enemy.
Applying Portraiture before doing your colour correction is another misstep. If you smooth first and then adjust white balance or exposure, you might exaggerate artefacts that the smoothing engine introduced, or you might push skin tones into a range that the mask didn't originally cover. Always do your raw processing and global colour work before you open the plugin.
Finally, people forget that Portraiture is a dedicated skin tool. It's not a general noise reducer, and it's not built to smooth backgrounds, fabrics, or skies. If you point it at a non-skin area and force the mask, the results are unpredictable at best. Use it for what it's designed for and you'll never be disappointed.
A batch of forty corporate headshots with consistent softbox lighting
It's a Tuesday evening and I've got a batch of forty corporate headshots from a morning shoot. The lighting was consistent—a single large softbox—so the skin work should be uniform across the set. I've already run my standard raw adjustments in Lightroom: exposure, contrast, a slight lift to the shadows, and a very gentle S-curve.
I pick one representative frame and open it in Photoshop. This will be my template. I duplicate the background, open Portraiture from the Filter menu, and the plugin fills the screen with its familiar interface. The preview shows the default smoothing, which I immediately dial back. I set Strength to 30%, switch output to New Layer with a mask, and spend about thirty seconds refining the skin mask for this particular sitter's complexion—a touch more specificity on the hue, a slight narrowing of the luminance range.
I tweak the Fine slider to 45% because these are business portraits and I want a clean but honest result. Medium goes to 55% to handle some uneven tone. I add a whisper of Warmth—just 3 points—because the softbox was a little cool. I save this as a preset called "Corporate Headshots" and click OK.
Back in Photoshop, I check the mask. It's good. I lower the layer opacity to 80%, add a quick curves adjustment for the eyes, and save. Then I record an action that applies this Portraiture preset and does the opacity drop automatically. For the remaining thirty-nine frames, I run the action, check the mask on each one, and move on. What would have been an evening of repetitive manual retouching is done in under an hour, and every frame looks consistent.
That's the rhythm of the tool when it's working well: a considered setup on one image, then a batch process that respects your time. The plugin doesn't replace your eye; it just takes the repetitive part off your hands so you can concentrate on the decisions that actually need you.
The latest update brings a next-generation AI smoothing engine. Build 4501 refines how the plugin reads skin texture, aiming to preserve more natural detail while reducing the manual cleanup work.
- Next-generation AI smoothing engine for more natural texture retention
- Build labelled 4501
- macOS 13 or later (also listed as macOS 15+)
- Runs natively on Intel and Apple Silicon Macs
- Photoshop or Lightroom Classic (separate downloads for each host)
- Interface language: English
Questions from the class 0
Sign in or join the class to ask a question.
Nobody has asked anything yet. If you have used it on a real job, say what the file did.
Also on the Mac Apps shelf
The whole Mac Apps shelf iMazing
Creates local, browsable backups of an iPhone or iPad and extracts specific files from them.
iMazing
Creates local, browsable backups of an iPhone or iPad and extracts specific files from them.
 Imagenomic Plugin Suite
Bundles three plugins that retouch skin, reduce noise and add film grain inside your image editor.
Imagenomic Plugin Suite
Bundles three plugins that retouch skin, reduce noise and add film grain inside your image editor.
 Infuse Pro
Plays almost any video file, including high-bitrate MKVs, direct to your screen or receiver.
Infuse Pro
Plays almost any video file, including high-bitrate MKVs, direct to your screen or receiver.
 iExplorer
Transfers music, messages and files between an iPhone and a Mac without using iTunes or iCloud.
iExplorer
Transfers music, messages and files between an iPhone and a Mac without using iTunes or iCloud.
 Hyperspace
Hunts down and deletes duplicate files that are quietly wasting your disk space.
Hyperspace
Hunts down and deletes duplicate files that are quietly wasting your disk space.
 iShot Pro-ScreenShot Recording
Captures screenshots, scrolling pages and screen recordings with a floating toolbar.
iShot Pro-ScreenShot Recording
Captures screenshots, scrolling pages and screen recordings with a floating toolbar.
 Hype 4 Pro
Constructs interactive HTML5 animations without writing a single line of code.
Hype 4 Pro
Constructs interactive HTML5 animations without writing a single line of code.
 iStat Menus
Puts CPU, memory, disk, network and weather stats right in your menu bar.
iStat Menus
Puts CPU, memory, disk, network and weather stats right in your menu bar.