 ASPNetWorld

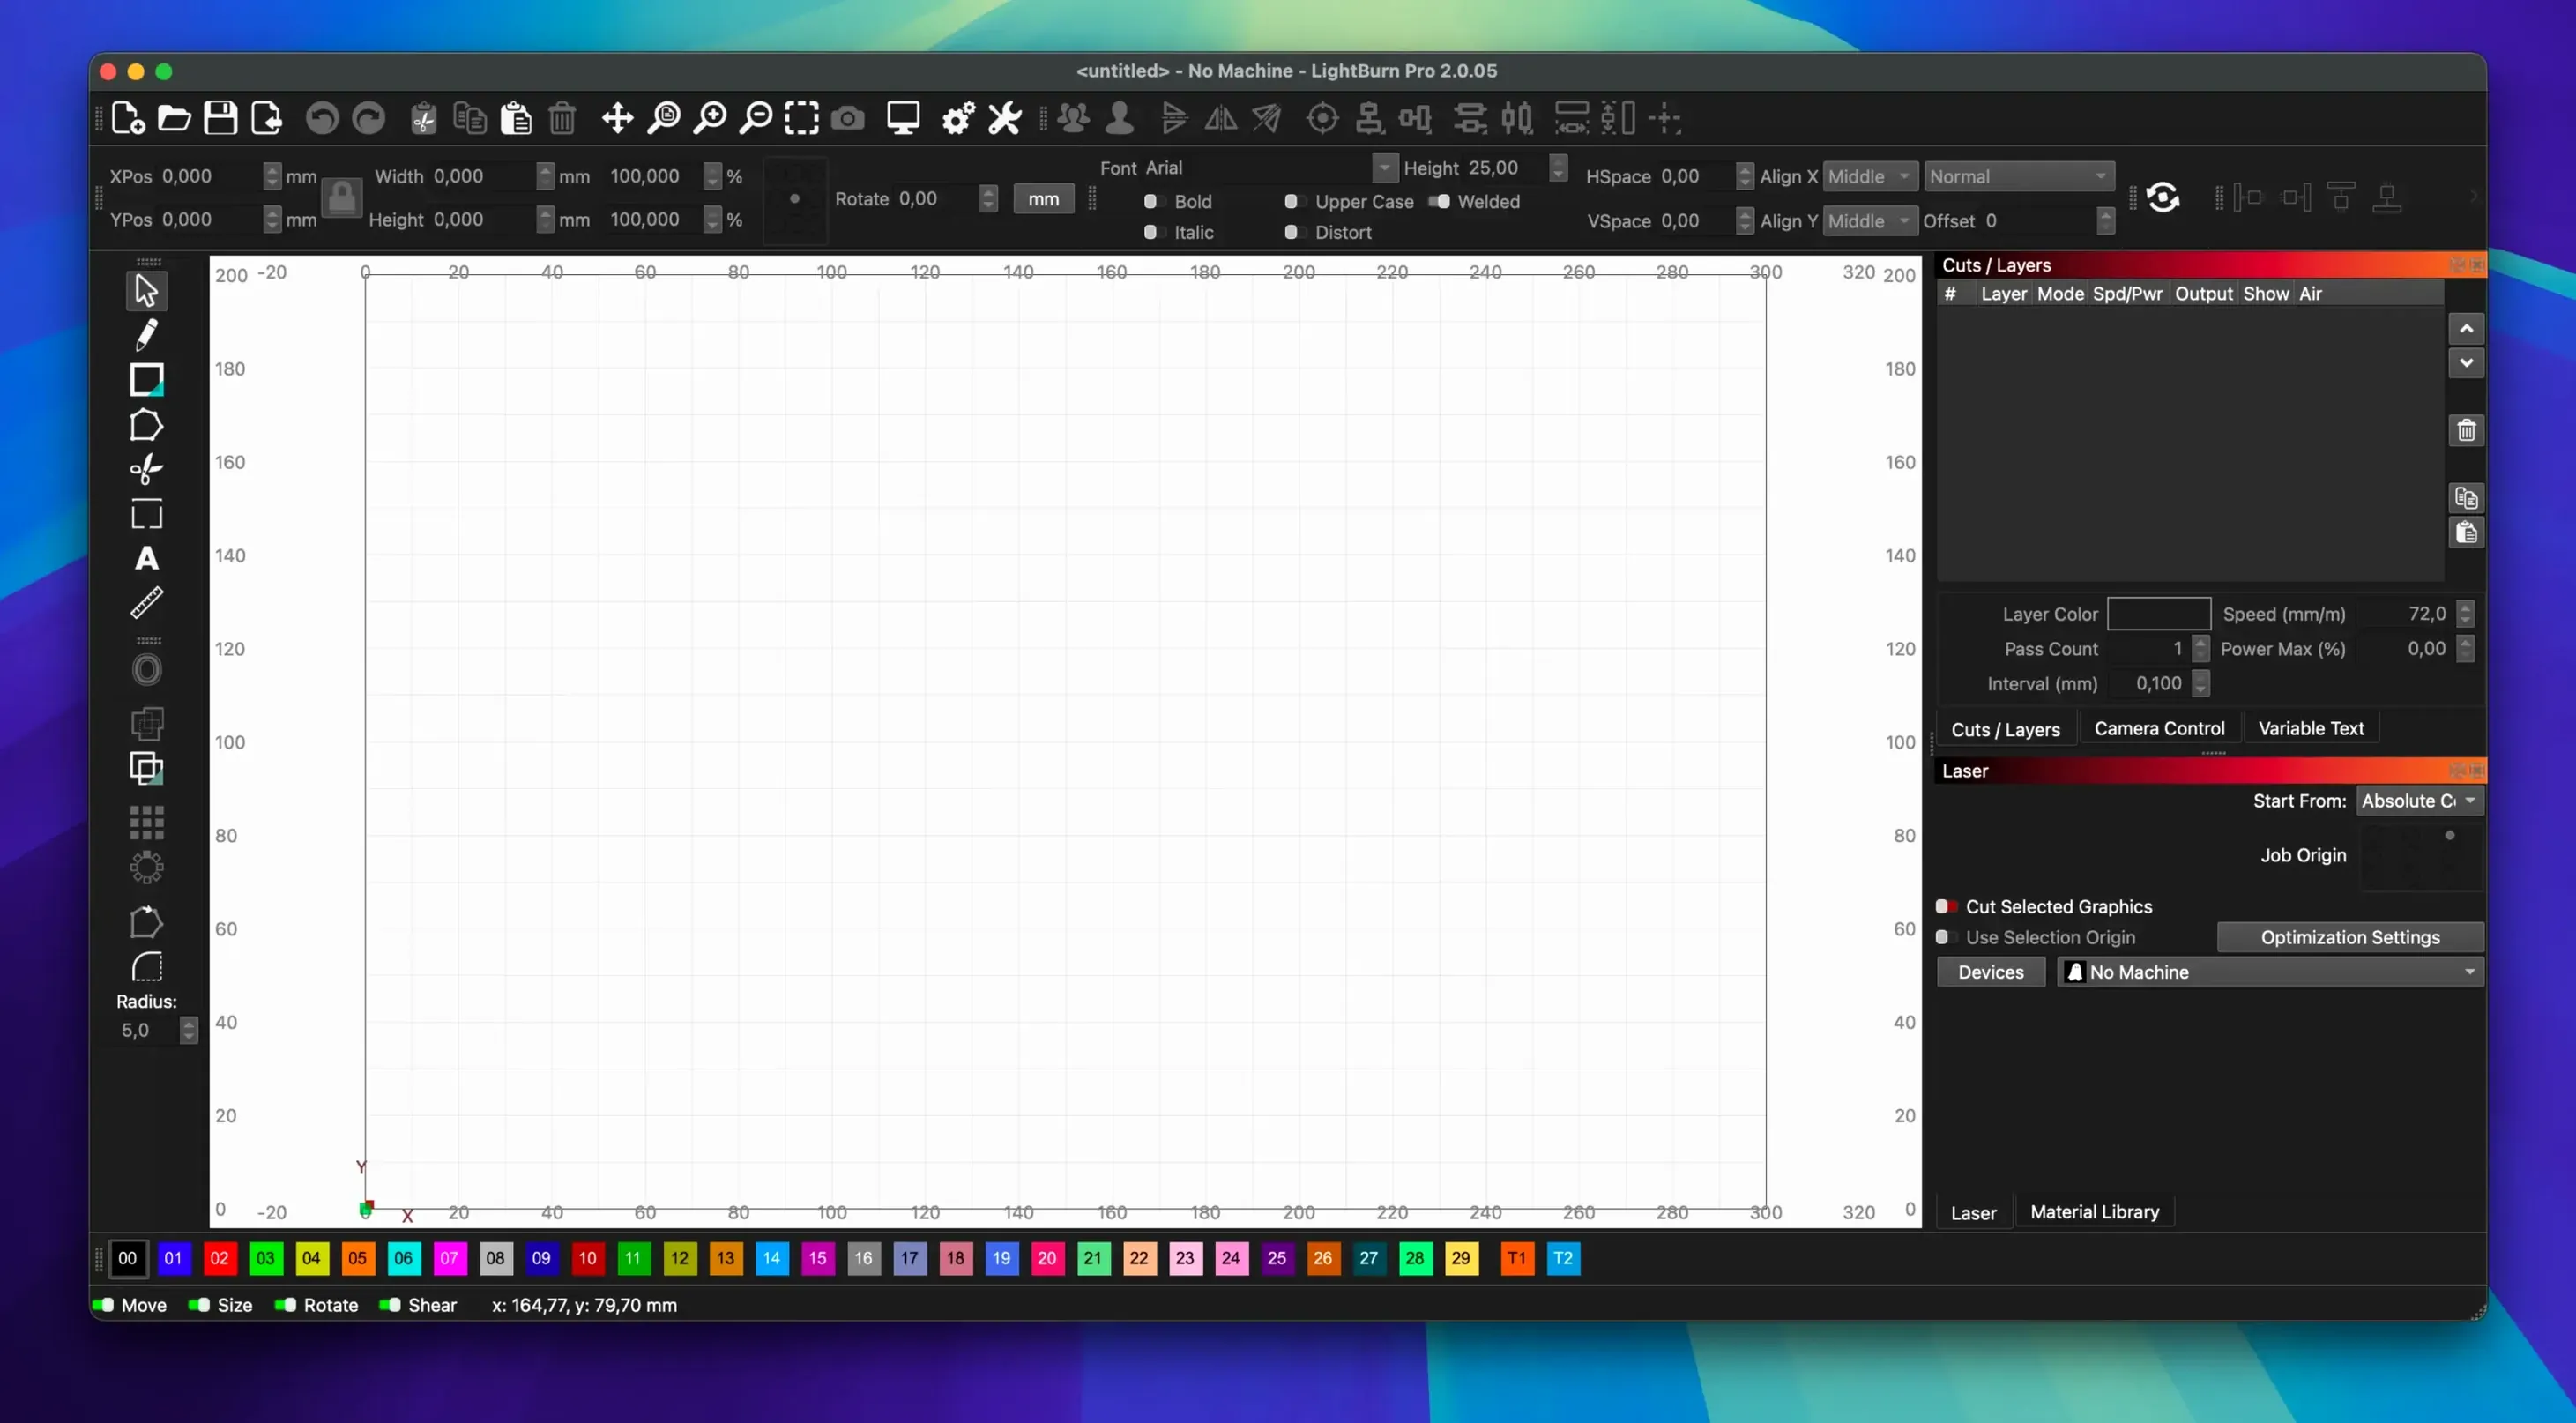
If you’ve ever sent a document straight from Pages to a desktop printer, you already understand the appeal of a single-app workflow. LightBurn applies that same idea to laser cutters, combining design and machine control so you aren’t bouncing between Inkscape or Illustrator and a bare-bones sender utility. On a Mac, that means fewer windows, fewer exports, and a lot less guesswork about whether the job will cut the way you drew it.
Draw and edit without leaving home
The built‑in vector editor gives you shape tools, node editing, and Boolean operations right where you need them. You can tweak a badge design or add a text curve without firing up another application, and the offset and weld tools make it quick to adapt a file for different material thicknesses.
Bring in artwork from your usual tools
When a project starts elsewhere, LightBurn reads AI, SVG, DXF, PDF, PNG and JPG files directly. That means a logo mocked up in Affinity Designer or a scan from Preview drops in without fuss, and you can mix raster engraving with vector cuts on the same job.
Drive the machine with real feedback
Camera support helps you position a design precisely over the material sitting in the bed, and a rotary axis turns cylindrical objects while the laser follows your artwork. The interface keeps power, speed and passes visible, so you are always two glances away from knowing what the machine will do next.
Switch on 'Return to Finish Position' so the laser head moves out of your way
Out of the box, LightBurn makes sensible assumptions, but a few preferences turn it from a capable controller into something that feels tuned to your workshop. The first stop should be the Device Settings dialogue. Here you set the working area to match your laser’s bed size; LightBurn won’t stop you designing beyond it, but the preview will show exactly where your artwork crosses the boundary, and that visual cue alone saves wasted material.
Next, open the Edit → Settings window and look for Start From. This controls whether the job origin is the laser’s absolute home, the current head position, or the centre of your design. Most people coming from a printer mindset want centre positioning, but a machine that homes at the top‑left behaves more predictably with the default Current Position — especially when you are nudging a second pass over a cut that didn’t quite go through. Pick one mode and stick with it for the first week while muscle memory builds.
The material library is another early win. It ships with sensible presets, but your plywood won’t match the developer’s test sheet. Run a small material test grid on a piece of scrap, note the speed and power that gave you the cleanest edge, and save those numbers into a custom entry. The library sits in the Cuts / Layers window and remembers everything, from pass count to air‑assist delay, so you can forget the numbers and just select “Baltic Birch 4mm” next time. On the topic of air assist, if your machine supports it, check the Enable Air Assist checkbox is wired to the correct output pin — the toggle in the layer settings is only half the story.
One last tweak that pays off quickly: in the Preview window, switch the simulation speed to slower than real‑time on your first few jobs and watch the travel moves. You’ll spot where the head skims over a delicate cut or where the order of operations could be rearranged, and that visual habit teaches more about cut sequencing than any manual.
What the 2.0‑era updates changed in everyday use
LightBurn’s shift into version 2.0 brought a handful of changes that quietly reshape a typical session. The most obvious is Dark Mode. If you work in a dim workshop with the laser’s enclosure lid up and an orange acrylic shield between you and the beam, a bright white interface is fatiguing. Dark Mode reduces glare and keeps your night vision intact, which matters when you are watching the first pass of an engraving to catch a focus slip.
The Edit Nodes toolbar arrived in the same release and turned node editing from a right‑click chore into a one‑handed operation. You can now grab the Smooth, Cusp or Symmetrical node tools straight from the toolbar, which speeds up cleaning traced artwork. Anyone who has spent twenty minutes zoomed in on a hundred‑point path knows that shaving five seconds per edit is the difference between finishing before supper and opening a bottle of wine in defeat.
Camera calibration was reworked too, and the improved overlay makes registration less of a ritual. You still need to place the alignment dots on the bed and tell the software where they are, but the visual feedback is clearer about what the camera sees versus what the laser will cut. For users who engrave on irregular offcuts or pre‑printed card stock, that tighter alignment reduces the “hold my breath and press Start” moment to something approaching confidence.
The maintenance releases since 2.0 have been quieter but practical. The version on this page, 2.0.05, addressed a window‑title‑bar quirk where saved offsets could leave the frame half off‑screen — the sort of detail that feels trivial until you drag a window back into view six times a day. It also corrected a rotary jogging direction in CCW mode, so the chuck spins the way the arrow says it will, and fixed a crash triggered by SVG files that contained ungrouped DEF shapes. None of these are headline features, but they are the sort of polish that means you reach for the lightburn mac full installer knowing the daily friction points have been sanded down.
You need Rosetta 2, but the performance hit is barely noticeable
“Does it work on an M‑series Mac without Intel?” Yes, but Rosetta 2 is required because the application is still Intel 64‑bit. In practice the performance hit is negligible for vector editing and machine control; the heavy maths happens on the laser’s controller, not your Mac. You install it once, macOS prompts you to fetch Rosetta if it is missing, and after that LightBurn behaves like any other app.
“Will I lose my existing material library if I switch from another machine?” The library is stored as a plain XML file that you can back up, email to yourself, or drop onto a fresh Mac. Power users often keep a master library on a USB stick that travels between the workshop machine and a laptop used for design on the sofa. Copy the .lbart file, drop it into the same relative folder inside LightBurn’s application support directory, and all your hard‑won speed‑and‑power values appear.
“Is there a difference between the Mac and Windows versions?” Feature‑wise they are identical. The Mac build uses the same file formats, the same controller protocols, and the same project files. The only practical difference is that the Mac version uses a DMG installer where you drag the app into Applications, and the font rendering might look marginally smoother because of macOS’s type engine. If you collaborate with a friend on Windows, swapping .lbrn2 project files works without conversion. Some people search for a lightburn torrent to explore cross‑platform parity, and once you point the DMG to a properly set up Applications folder, everything the real‑world workflow demands falls right into place.
Small-batch makers who design and cut on the same machine
The short answer is anyone who designs and cuts on the same computer, but three groups stand out. The first is the small‑batch maker: someone cutting acrylic jewellery, personalised coasters, or wedding signage in runs of ten to fifty. For them, the integrated editor means a last‑minute text change doesn’t require exporting from another app, re‑importing, and re‑aligning. They spot a typo, double‑click the text, fix it, and hit Start inside thirty seconds.
The second group is the educator or workshop tutor running evening classes. LightBurn’s camera overlay and material presets let students walk up, place a piece of plywood, align their artwork by eye on the screen, and cut without needing to understand workpiece coordinates. The tutor sets up the machine profile and material library once, and the students stay inside a safe, predictable workflow. The fact that LightBurn runs on older Macs back to macOS 10.13 means a lab full of hand‑me‑down machines can share the same software, and a quick lightburn mac crack search often leads to builds that, with Gatekeeper temporarily adjusted, handle the whole fleet just as smoothly.
The third group is the mixed‑media artist who moves between raster engraving, vector cutting, and rotary work on the same piece. They might engrave a photograph onto a wooden box lid, cut the box outline from the same file, and then engrave a band around the side using the rotary axis — all in one project. LightBurn’s layer system keeps each operation separate with its own power and speed, and the preview shows how the layers stack in time. That holistic view of a complex job is hard to replicate when design and control live in two different programs.
Version 2.0.05 tidies up a few rough edges that crept into recent builds. The window title bar now lands in the right place even when stored offsets go awry, and rotary jogging in CCW mode behaves as expected again. A crash that could occur when importing SVG files with ungrouped DEF shapes has also been squashed.
- macOS 10.13 or later (macOS 11 users are directed to LightBurn 2.0.05)
- Intel 64‑bit processor; Apple Silicon Macs require Rosetta 2
- Interface language: English
Questions I keep hearing
Does LightBurn run on Apple Silicon Macs?
Yes, it runs via Rosetta 2 on Apple Silicon Macs, with the current version built for Intel 64‑bit architecture.
Questions from the class 0
Sign in or join the class to ask a question.
Nobody has asked anything yet. If you have used it on a real job, say what the file did.
Also on the Mac Apps shelf
The whole Mac Apps shelf Linguist
Translates text you select in any app without switching windows.
Linguist
Translates text you select in any app without switching windows.
 Little Snitch
Alerts you to every network connection your Mac tries to make and lets you approve or deny it.
Little Snitch
Alerts you to every network connection your Mac tries to make and lets you approve or deny it.
 Live Home 3D Pro
Builds detailed floor plans and 3D walkthroughs of interior and exterior spaces.
Live Home 3D Pro
Builds detailed floor plans and 3D walkthroughs of interior and exterior spaces.
 LaunchOS
Replaces the standard Launchpad with a faster, keyboard-friendly app launcher.
LaunchOS
Replaces the standard Launchpad with a faster, keyboard-friendly app launcher.
 Logoist 5
Creates logos, icons, and vector illustrations using layers, effects, and a built-in style browser.
Logoist 5
Creates logos, icons, and vector illustrations using layers, effects, and a built-in style browser.
 LanScan
Scans your local network and lists every connected device with its IP and MAC address.
LanScan
Scans your local network and lists every connected device with its IP and MAC address.
 Luminar AI
Edits photos using templates that analyse the image and apply adjustments automatically.
Luminar AI
Edits photos using templates that analyse the image and apply adjustments automatically.
 Luminar Neo
Layers multiple AI-driven edits onto a photo and lets you relight or swap backgrounds non-destructively.
Luminar Neo
Layers multiple AI-driven edits onto a photo and lets you relight or swap backgrounds non-destructively.