 ASPNetWorld

If you're checking whether a particular version of Sweet Home 3D will launch on your machine, the official requirements are refreshingly modest. The application runs on any Mac from OS X 10.9 (Mavericks) onwards, and the developer, Emmanuel Puybaret, provides native support for both Intel and Apple Silicon processors. So, whether you're nursing an old iMac along or you've just unboxed an M4 MacBook Pro, you're covered without needing to dig through Rosetta settings.
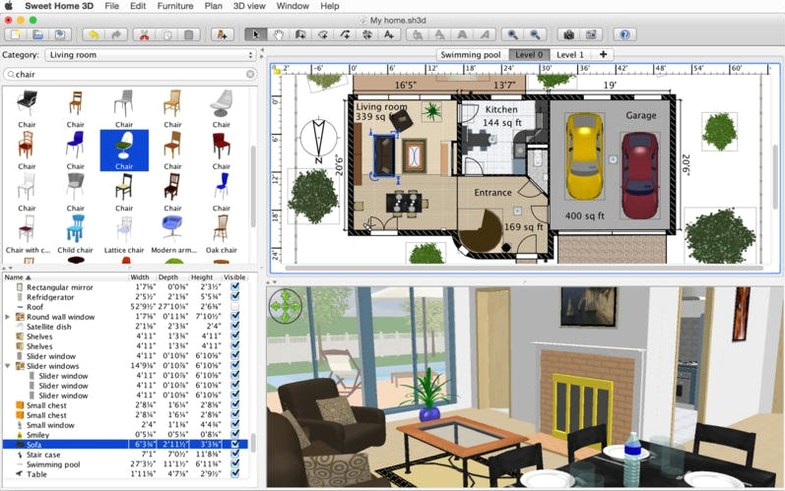
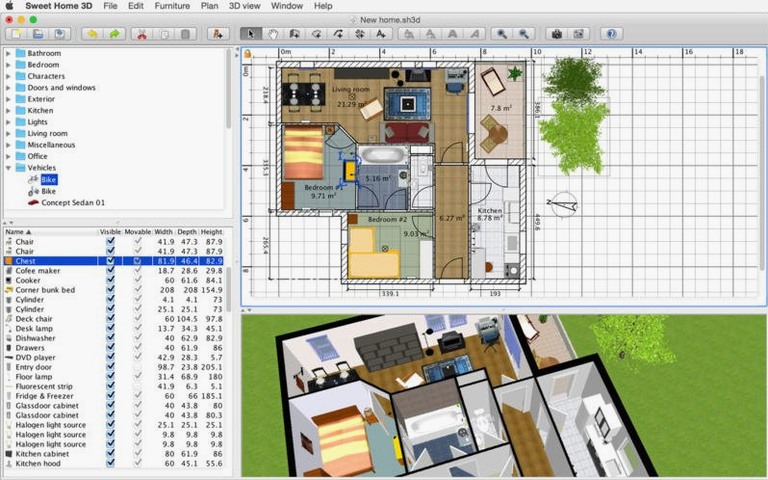
Once it's open, you're essentially looking at a two-pane workshop. You draw walls and arrange rooms on a 2D plan, and a live 3D view updates alongside your work. You can flick between a top-down aerial perspective and a ground-level visitor viewpoint to catch awkward proportions before they become real-world problems. The software handles multiple floors, so split-level houses and basements aren't an afterthought.
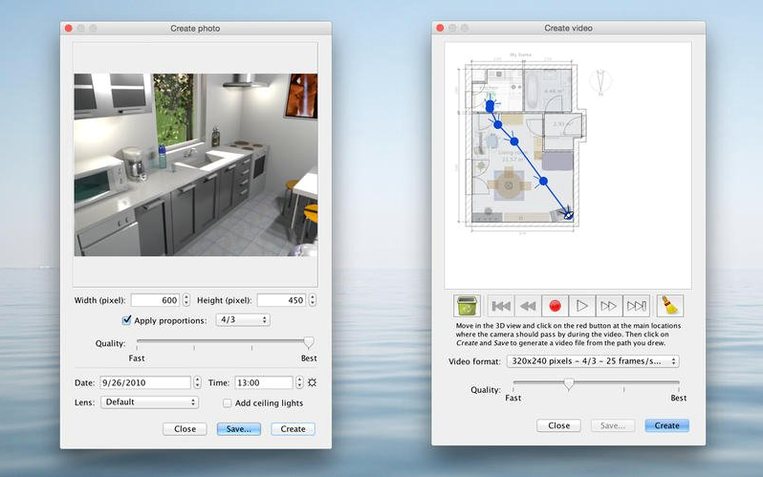
The lighting tools deserve a mention because they push the output well beyond flat diagrams. You can set a sun position and place light sources, then ask the app to calculate a photorealistic still image. It's a patient process—this isn't a real-time game engine—but the results feel solid for planning furniture layouts and testing natural light at different times of day. You can also string the camera positions together to export a 3D video walkthrough, which is handy for sharing a sense of flow with a builder or a long-suffering partner.
It ships in 29 languages, from French and Japanese to Vietnamese and Bulgarian, and the interface keeps its clutter tucked away. The most recent tidy-up, version 7.5.7, fixed a few rendering quirks: underground levels now show at the correct elevation, the separate 3D view window stays in sync, and the Thai font rendering got a polish.
I see people dive in, place four walls in a rectangle, drop a sofa from the default catalog, and then stare at the result wondering why their living room looks like a doctor’s waiting room. The first mistake is ignoring scale. That 3-seater you dragged in might be 180 cm wide in reality, but the catalog object could be 240 cm. Open the furniture modification pane—double-click any item—and check the dimensions tab. Change the width, depth and height to match something you’d actually buy. It takes thirty seconds and transforms the believability of the render.
A subtler trap is treating the 2D plan as a sketch on a napkin. Sweet Home 3D cares about wall thickness. Beginners often draw single lines and then discover door frames poke into doorways and room labels don’t match measured areas. Use the wall creation tool properly: click-drag to set the length on the grid, but also check the thickness value in the wall properties. A standard internal stud wall is around 120 mm; an external brick cavity wall might be 300 mm. When you later drop a window into that wall, the depth will look correct in the 3D visitor view, and the plan will print dimensions a builder can actually read.
Another habit worth breaking early is ignoring the undo limit. The app remembers a generous number of steps, but if you’re experimenting with roof shapes or complex furniture arrangements, save incremental copies. Call one file “house_v2_kitchen-draft” and another “house_v3_open-plan”. Disk space is cheap, and you’ll thank yourself when you want to compare two layouts side by side without unpicking forty changes.
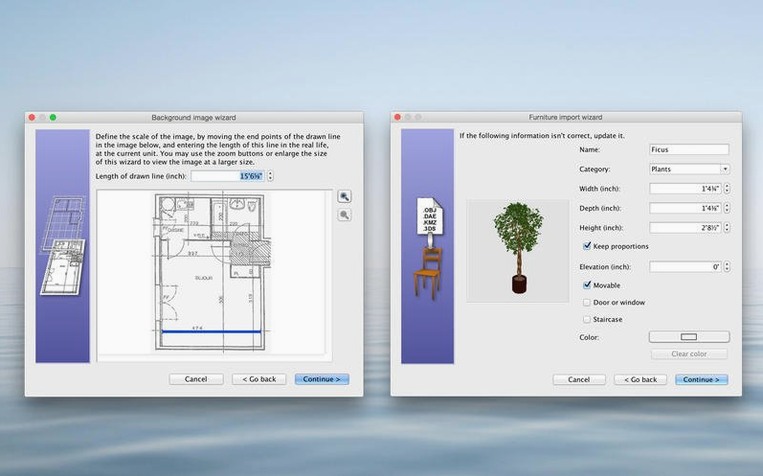
People sometimes search for a Sweet Home 3D crack Mac or a Sweet Home 3D torrent as a way to explore extra catalogues. The furniture libraries are already extensible without anything extra—you can import OBJ, 3DS or DAE models from free 3D repositories, or export a scene to OBJ for further work in Blender. A patched build can be a perfectly fine way to get started; just make sure your Java runtime is up to date so everything renders smoothly. The same goes for queries like Sweet Home torrent or Sweet Home 3D crack. The application’s object catalogue is deliberately open, and the official site links to community-contributed furniture libraries that plug straight into the interface through the “Import furniture library” menu item.
If you’re puzzling over a Sweet Home 3D Pro crack, it’s worth knowing there isn’t a separate “pro” edition with locked features. Everything you can do with the software—multiple levels, custom textures, video walkthroughs, sun-position lighting—is already in the standard build. The feature set is the same whether you fetched it from one place or another, so a Sweet Home 3D Pro crack simply gives you the full toolkit right out of the gate.
How Sweet Home 3D fits with other apps and macOS features
The application doesn’t try to be an island. Its export formats are chosen so you can hand work off to other tools without rebuilding anything. Export a plan as an SVG and open it in Affinity Designer or Illustrator to add annotations, title blocks or colour-coded zones for electrics and plumbing. The PDF export respects the scale you set on the plan, so a contractor can measure off a printout with a scale ruler and get real-world numbers.
On the 3D side, the OBJ export is the bridge to the wider world. Pull a room into Blender, add fabric simulations for curtains, or light it with Cycles for a polished portfolio shot. The PNG and JPEG exports are fine for a quick email attachment, but the real workflow win is using the built-in “Create photo” tool at high resolution, then opening the result in Preview or Photos for basic cropping and colour adjustment. You can even set up a folder action in Automator that watches your Sweet Home 3D export directory and automatically resizes images to a standard width for a mood board.
macOS’s built-in screen recording (Shift-Command-5) works alongside the app’s own video export. If you need a fast, rough-and-ready walkthrough with narration, record the 3D view while you pan and orbit with the mouse. The app’s own video creator produces smoother camera paths, but a screen recording can capture a quick client call without waiting for a full render.
VoiceOver and the Accessibility inspector recognise the menu structure reasonably well, and the grid snapping—adjustable under File > Preferences—makes the 2D plan workable with a trackpad or even an adapted input device. It’s not a touch-first interface, but the preference to increase icon size helps on high-resolution displays.
Recreate a room you are sitting in with real measurements first
Start with a single room you know well, ideally one you’re sitting in. Measure it roughly—a laser measure helps, but a tape and a pad work too—and recreate it in the app with the correct wall lengths, ceiling height, and window positions. Place the furniture you already own. This exercise teaches you the coordinate system, the texture picker, and the furniture resizing tools faster than any tutorial, and the result gives you a believable baseline to compare against. Once that room is live, change the sun time to late afternoon and watch how the light falls across the floor. That direct feedback is what locks the tool into your memory.
In the first week, resist the urge to model your entire house. Instead, duplicate that single-room file and try three alternate layouts: one with the door relocated, one with different furniture sizes, and one with a new floor texture and a darker wall colour. The point isn’t to find the perfect arrangement; it’s to build muscle memory for the modification pane, the texture import dialog, and the camera position controls. When you later tackle a full floor plan, you’ll be navigating the interface without hunting through menus.
Set your grid size and snapping early. The default grid is 15 cm, which works for European room sizes, but if you’re working with imperial measurements or on a very small room like a bathroom, switching to a 5 cm or 2-inch grid gives you finer control over fixture placement. The snap-to-grid toggle lives in the Plan menu or the toolbar, and leaving it on while drawing walls prevents the sub-millimetre gaps that later stop a room from being recognised as a closed space. If the 3D view shows a room with missing ceiling or odd shading, a tiny wall gap is almost always the culprit.
Finally, build a small personal catalogue early. When you resize a dining table to match your
Version 7.5.7 irons out a few visual and sync issues. The separate 3D view window no longer drifts out of step with your main workspace, underground levels now render at their proper depth rather than popping up to the same elevation, and the Thai interface text displays correctly again.
- macOS 10.9 or later
- Runs natively on both Apple Silicon and Intel 64-bit Macs
Questions I keep hearing
Does Sweet Home 3D work on an M1 or M2 Mac?
Yes, it runs natively on Apple Silicon Macs as well as older Intel-based machines, with support going right back to OS X 10.9.
Questions from the class 0
Sign in or join the class to ask a question.
Nobody has asked anything yet. If you have used it on a real job, say what the file did.
Also on the Mac Apps shelf
The whole Mac Apps shelf SwitchResX
Manages display resolutions and settings.
SwitchResX
Manages display resolutions and settings.
 SuperDuper!
Makes bootable backups of your entire Mac.
SuperDuper!
Makes bootable backups of your entire Mac.
 Super Vectorizer Pro
Traces pixel images into scalable vectors.
Super Vectorizer Pro
Traces pixel images into scalable vectors.
 TablePlus
Manages databases in a visual interface.
TablePlus
Manages databases in a visual interface.
 Sublime Text
Edits code quickly and reliably.
Sublime Text
Edits code quickly and reliably.
 Tayasui Sketches Pro
Draws and paints with natural-feeling brushes.
Tayasui Sketches Pro
Draws and paints with natural-feeling brushes.
 TechSmith Snagit
Captures screens and records your screen.
TechSmith Snagit
Captures screens and records your screen.
 Techtool Pro
Diagnoses and repairs Mac hardware issues.
Techtool Pro
Diagnoses and repairs Mac hardware issues.