 ASPNetWorld

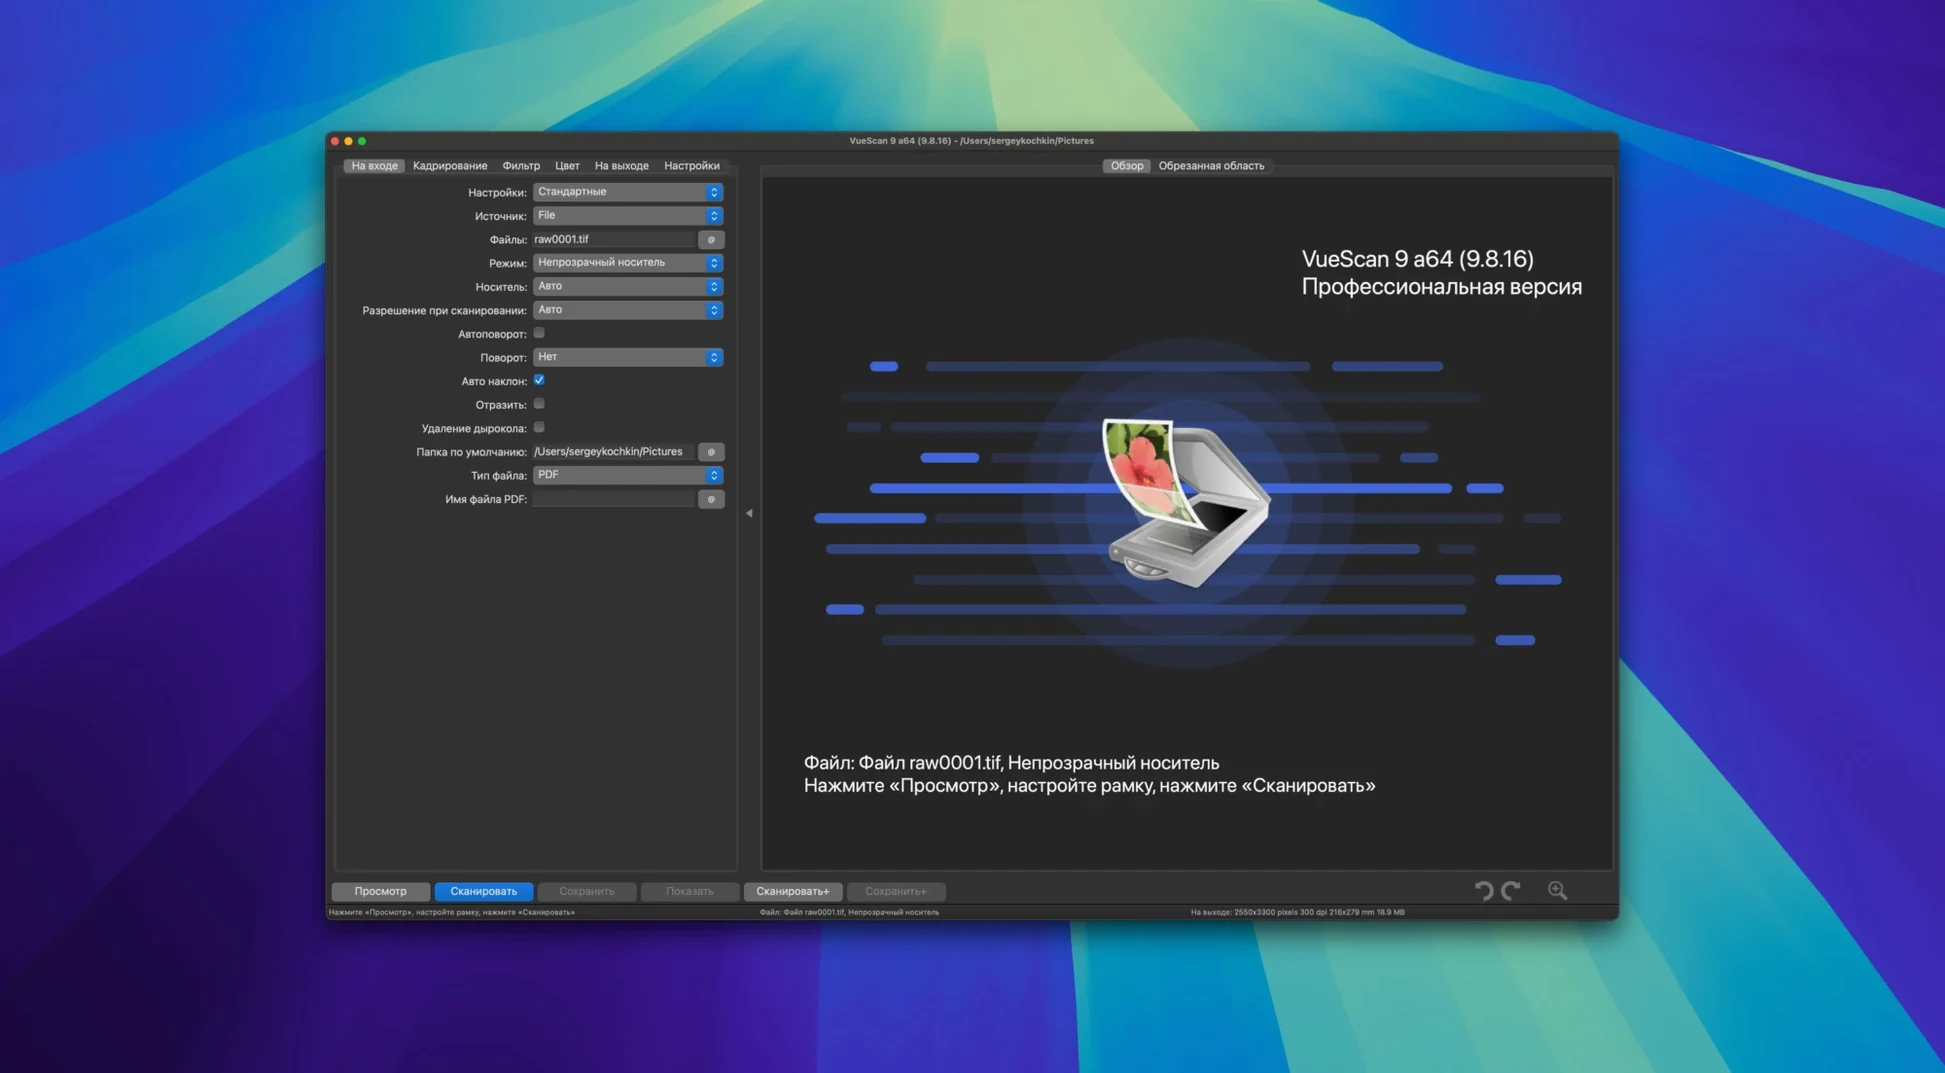
VueScan Pro runs on any Mac using macOS 10.15 (Catalina) or later, natively on both Intel and Apple Silicon machines, and it brings its own scanner drivers to the table so you are not reliant on whatever the manufacturer last released a decade ago. For the experienced user, the value lives in the fine-grained tools that sit under the surface.
Per-channel tone curve — a manual adjustment that lets you reshape the tonal response independently for the red, green and blue channels. Rather than a single contrast slider, you get separate control over how shadows, midtones and highlights render in each colour, which is useful when a scanner’s sensor has an inherent colour bias you want to correct at capture rather than in post.
Multi-pass averaging — the software scans the same original multiple times and averages the results. This suppresses random sensor noise that a single pass cannot shake. The improvement is subtle on a clean print but becomes meaningful with dense slides where grain and noise compete with image detail.
Dynamic range control — a direct way to set the exposure and the range of density the scanner captures. You can protect shadow texture by pulling the black point back or hold highlight detail by reigning in the white point before any file-format clipping occurs.
Grain reduction and unsharp masking — two filters that work together. Apply grain reduction to smooth the noise structure in fast film scans, then use unsharp masking with a light radius to restore the perception of sharpness without amplifying the grain you just tamed. A colour-cast removal filter sits alongside them for quick neutralisation of the orange mask on colour negatives.
Expecting VueScan to work like the scanner’s own software
Most people opening VueScan for the first time do the same three things wrong, and they all stem from expecting it to behave like the scanner’s own software. The most common mistake is leaving the output set to Flatbed when scanning a strip of negatives on a film scanner. VueScan will happily scan the entire bed as one image — including the backlight bleeding around the film holder — and you end up with a washed-out mess that took four minutes to capture. The fix is simple: switch the Mode to Transparency so the software knows it is dealing with light passing through film rather than bouncing off paper.
The second mistake is ignoring the Input | Media setting. If you leave it on Image and scan a colour negative, the orange mask stays baked in and the colours come out comically blue and flat. VueScan needs to be told what it is looking at — choose Color negative and the software applies the correct base-orange subtraction and contrast curve. On that note, a lot of newcomers also overlook white balance. An old trick worth knowing: after selecting Color negative, click the Lock exposure button, then click an empty patch of unexposed film leader. That gives VueScan a reference for the film base colour and the inversion becomes far more accurate.
The third beginner slip-up is leaving Media size at Auto and then wondering why every scan crops tighter than expected. Auto sizing often grabs the first object it detects, which might be a sliver of the frame rather than the full image area. Set the media size manually to match your holder — 35mm strip or 6x6 cm, for example — and you get the whole frame every time.
Your USB scanner doesn’t show up in the source list on a newer Mac
A handful of problems crop up regularly enough that they deserve their own section. First: the scanner simply does not appear in VueScan’s source list. This happens most often with USB models on newer Macs where the operating system has tightened its USB access rules. The quickest remedy is to open the VueScan application, go to the Scan menu, and choose Rescan for devices — but only after unplugging the scanner, counting to five, and plugging it back into a port directly on the Mac, not through a hub. Hubs that share a USB controller with other devices occasionally starve a scanner of the bandwidth it expects at startup.
Second snag: scans that looked fine in preview turn out far darker or lighter in the saved file. This is nearly always a colour-management mismatch. Under the Color tab, the Monitor color setting only affects how the preview renders on screen — it does not embed that profile into the file. For a consistent result, set the Output color space to Adobe RGB if you plan to edit the file, or sRGB if it is heading straight to the web. Then, under Output, make sure TIFF color space or JPEG color space matches. When these two drift apart, your image viewer is essentially displaying a different interpretation of the numbers than what you approved in the preview window.
Third: the Infrared clean option is greyed out even though the scanner has an IR channel. VueScan requires the scan mode to be set to something that produces an infrared pass — Transparency plus Media: Image on a flatbed will not trigger it. Switch the media type to Color negative or Slide and the infrared option should light up. If it does not, the scanner’s IR lamp may simply be built into the transparency adapter and the software is reading that hardware flag correctly.
Scanning a faded colour print from start to finish
Here is a workflow for a task that trips up people who have only ever scanned fresh prints: restoring a faded 1980s colour photograph that has shifted heavily towards magenta. The aim is to pull back colour information that seems lost, without pushing the scan into a noisy, over-processed look.
Place the print on the flatbed and open VueScan. Set Input | Mode to Flatbed and Input | Media to Color photo. Before you even hit Preview, drop the Input | Bits per pixel to 48 bit RGB. A faded print has thin tonal separation in the highlights and shadows — 24-bit mode discards the subtle gradations you are about to stretch, so giving yourself 16 bits per channel keeps banding at bay.
Run the preview, then draw a crop marquee around the image area, leaving a few millimetres of border so you do not clip edges. Under the Color tab, look for the White balance setting and choose Auto. This neutralises a surprising amount of the colour cast in one hit. If the result still looks excessively magenta, open the Color tab’s Color balance sliders. Here VueScan gives you independent adjustment for shadows, midtones and highlights across cyan-red, magenta-green and yellow-blue axes. Pull the midtone magenta-green slider a few notches towards green — slowly, watching the preview update — until skin tones look plausible rather than sunburnt.
Next, open the Filter tab and enable Restore fading. This filter works by estimating how dyes degrade over time and building a gentle compensation curve per channel. On a print that has lost yellow density, it can bring back a warmth that feels natural rather than artificially boosted. Follow it with a light touch of Unsharp mask — a radius of 1.5 and an amount around 40 is usually enough to recover the texture of the paper without emphasising scratches.
For output, choose TIFF as the file type, set TIFF compression to LZW for a lossless file that is still reasonably compact, and make sure TIFF color space is set to Adobe RGB so the extra gamut you pulled from the 48-bit capture is not clipped on save. Name the file with the @date token in the output tab’s file name field — a feature added in version 9.8.57 that stamps the current date and time into the folder or file name automatically — and scan.
The Lock exposure button also freezes settings across previews
VueScan packs a surprising number of workflow shortcuts into its interface, and most people only discover them by accident. The Lock exposure button, for instance, does double duty: click it once and the exposure settings freeze so you can preview different crops without VueScan re-metering the image; click it again and it releases. That alone saves twenty seconds per scan when you are working through a strip of six frames that all need the same exposure.
The File name field under the Output tab accepts a flexible shorthand syntax. Typing scan plus + tells VueScan to increment the number by one with each press of the scan button. With version 9.8.57, you can also set a varying increment like file001+2.jpg to number every other file, which is useful when you are scanning alternate frames and leaving gaps for later. Adding @Crop appends the crop dimensions to the file name, and @Scan adds the scan resolution — both handy for keeping metadata human-readable without a separate log.
The Graph button on a preview scan opens a live histogram and tone-curve overlay that most users never click. You can drag points on the curve directly rather than using the number fields, and the histogram updates in real time as you adjust the black and white points. It is the fastest way to set the tonal range of a difficult slide because you can see exactly which part of the histogram you are clipping.
Another hidden gem: holding the Option key while clicking a preset in the File menu’s Save settings submenu creates a new preset file based on the current state of every tab. Standard presets only save a few key parameters; an Option-click preset captures everything, including your custom filter stack and per-channel curve adjustments, so you can build a library of scanner-and-media-specific starting points that load in one click.
VueScan Pro 9.8.59 arrives with under-the-hood fixes and general refinements that keep scans running smoothly.
- macOS 10.15 (Catalina) or later
- Runs natively on Apple Silicon — no Rosetta translation layer needed
Questions I keep hearing
Can VueScan Pro control the scanner’s exposure directly?
Yes, you can set exposure, maximum colour depth, and output file format manually, giving you control over how much light hits the sensor before the scan is written.
Questions from the class 0
Sign in or join the class to ask a question.
Nobody has asked anything yet. If you have used it on a real job, say what the file did.
Also on the Office shelf
The whole Office shelf Wolfram Mathematica
Complements your spreadsheet and text editor with thousands of built-in maths and AI functions.
Wolfram Mathematica
Complements your spreadsheet and text editor with thousands of built-in maths and AI functions.
 Vellum
Turns your manuscript into polished ebook and print editions without wrestling styles.
Vellum
Turns your manuscript into polished ebook and print editions without wrestling styles.
 XMind Pro
Turns messy meeting notes into a clear, branching mind map on your desktop.
XMind Pro
Turns messy meeting notes into a clear, branching mind map on your desktop.
 Typora
Writes in Markdown and sees a clean, formatted document appear around your words as you type.
Typora
Writes in Markdown and sees a clean, formatted document appear around your words as you type.
 Things
Captures to-dos the moment they occur and organises them into a calm daily list.
Things
Captures to-dos the moment they occur and organises them into a calm daily list.
 Text Workflow
Transforms messy text with chains of reusable steps you can save and share.
Text Workflow
Transforms messy text with chains of reusable steps you can save and share.
 SpeakMe
Reads text aloud on any recent Mac.
SpeakMe
Reads text aloud on any recent Mac.
 SimpleMind Pro
Maps your ideas outwards from a central node instead of writing them in a vertical list.
SimpleMind Pro
Maps your ideas outwards from a central node instead of writing them in a vertical list.